Sunday, September 20, 2015

September 2015 Meeting

As the time for the meeting got closer and closer I was starting to wonder if our members were more interested in the televised debate than to come to the meeting.  With 10 minutes to go, attendance looked a little sparse!  Politicians vs. wood --- how can that be?


I didn't think the politicians would win out over the woodworkers and by the time we started we had a good group of 26 or so, heck some even had to stand in the back.


     We began the meeting with our customary round robin introductions and there were a couple of first timers, welcome to you!  As far as our business portion of the meeting went there are a couple of exciting events coming up next month.  Let's start with this one:  Lie-Nielsen Tool Event will be at Jamie's again this year.  Check out the link for a video and more information about it. They will be here Friday and Saturday the 16th. and 17th. of October.  They usually invite a few select craftsman to set up a booth at these events and this year Dennis Patchett our accomplished carver was invited to show his work and skills.
     The Woodcarvers club that meets at Woodworkers Emporium has a few classes in the planning stage.  One will be on chip carving and the other will focus on carving Cottonwood bark.  You may recall that Dennis and Randy brought in some examples of that type of work.  They meet the fourth Saturday of the month.
     The Summerlin Craft Fair will be held in October as well.  It has changed its location from the park on Town Center Drive to the new, outdoor mall located by the Red Rock Casino.  The dates are October 10-11 and Downtown Summerlin is located on Charleston Blvd. west and the 215 Beltway.  Not sure if any other members will be having a booth there but I will be set up with boxes and some furniture pieces.
     Lastly, Mike noticed a neighbor cutting down a Mesquite tree so brought many pieces of it for and had it "up for grabs" for the many turners in our group.  I saw all of them going out the door at the end of the meeting -- Thanks Mike!

Show & Tell
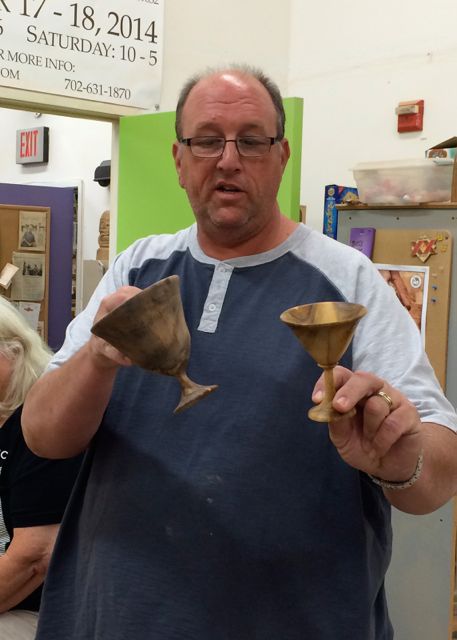


     Speaking of wood turners, of the many members in our group that have gotten the bug, John brought in these examples of his latest work.  These are examples of green wood turnings that take on some very interesting shapes as the wood air dries after being cut green.  Wood for these were Apple and some sort of a Pepper tree.  It's a little difficult to tell but notice how the rim of the one on the left is beginning to distort a little?  That's what occurs after cutting the wood green as it begins to dry out.  Nice work John!


     I brought in this portable easel and palette made from some of the leftover Mahogany from the Armoire.  It's a light weight assembly that an artist (my wife) can take for painting outdoors or attending workshops.  It's used in conjunction with a camera tripod.  The easel portion attaches by using the camera clip that comes with the tripod.  The lower section is used for the paint palette, brushes, thinner, rags, etc.


Featured Presentation: Beth Wheeler 

Beth and her Chair


     Beth recently returned from a week long, chair making workshop with Jeff Lefkowitz.  Here is a LINK to his website.  Although you may not be familiar with his name, many of you have heard of Brian Boggs and his chair making expertise.  Here is a LINK to his site as well.  The reason both of these names are brought up is because Jeff started out making chairs on his own but then, like Beth; took a class from Brian.  He and Brian hit it off and eventually he became the only person authorized to teach the skill of making a Brian Boggs chair to others.  An interesting note here is that although you can learn to make one, only Brian Boggs is allowed to sell them; the ones you make are for personal use only!


Extra Legs


     Before she left for the class which is located in Virginia she made arrangements to buy an additional set of back legs and also enough bark to make another chair when she arrived back in Las Vegas.  These are carefully selected since they need to be steamed and then placed in a form Jeff made for about a week.  Each leg blank needs to be steamed for 2-3 hours then quickly placed in the form and allowed to dry for a week or so in a heated closet.  A unique feature of them is that they are canted at about 45 degrees to orient the wood grain for optimum joint strength.

     Once the legs are ready to be worked and turned into these beautiful chairs the joints are cut where needed but Beth found a new passion in using a shave horse to transfer these square pieces of material into beautifully sculpted legs.  This process begins with a drawknife and ends with a spokeshave.  There is a video at the end of this blog where she did a short demonstration of this process.
Shave Horse Example

     A shave horse is a device that captures the wood in a vise that has pressure applied with your feet.  Matter of fact, Beth was so enthralled by this device she ordered one for herself that was waiting for her at home when she returned from the workshop!  The process of making a square piece round begins by cutting of the corners to create an octagon.
From square to round!
These are then basically halved so you create a 16 sided piece then once more to create a 32 sided piece.  By drawing lines around it every couple of inches you get a visual of how much material is taken off with a spokeshave as the stock becomes round.


     Due to the time involved in making the rungs for the chair, Jeff had these lathe turned and ready for the workshop students to use.  The official length of time for the workshop is 6 days so it was necessary for the rungs to be ready when the class started.

Chair Jig 


     Locating and cutting in all of the needed holes for the rungs, seat, legs, and arms was simplified with the use of this jig which Beth also bought for making her second chair.  As part of the course, Jeff provides a very complete manual that shows how to make the chair.  The last part to be assembled are the arms.  When you look at it they seem to be tenoned into the rear leg and also onto the front leg -- a process that really isn't possible!  Instead, the fronts have a small recess used to locate them and they are then drilled and pinned from above.  Beth hand carved these pin tops into an octagon shape.
The pins used to secure the back slats to the legs were also carved into a pyramid shape.  Now that the chair is completely assembled it's time to turn your attention to weaving the seat.  A number of materials could be used; Shaker tape, rush, seagrass, etc. and Beth decided to go with Hickory bark which as you can see is a great contrast to the Walnut of the chair.  The bark is harvested in the spring and I believe she said there are about 200 feet of it required for one chair.  It's kept wet so it remains pliable for the weaving process and the first step is to wrap the strips from front to back.  Most seats are wider in the front than in the rear so to compensate for that design feature those strips at the outer edges needed to be tapered.  This is done with a knife.
Waxed cord to splice Hickory 
After the seat is wrapped from front to back weaving the pattern begins going from side to side.  Bark pieces start out about 20 feet in length so at first you're pulling these long pieces over, under, around, and through each of the wrap strands.  To join them together you plan a splice at the bottom which is attached with waxed cord.  A very time consuming but interesting process --- until you realize you missed a strand!  Just saying, not that I've ever done that!!  The end result is a seat that is both comfortable and beautiful.
Completed Seat
All in all, this workshop gave Beth everything she was looking for as her woodworking skills continue to grow.  It had an emphasis on the use of hand tools which was one of her main objectives.  She'll now be reaching for a card scraper rather than a sheet of sandpaper, grabbing a chisel instead of a router, and enjoying the process hand tools can bring. 

      Beth showed how to use the drawknife and spokeshave to take square stock and make it round.  The process is one where the stock is taken from square to an 8 sided piece (octagon), then 16 sided, and finally 32 sided mostly with the drawknife.  She then refines that piece with the spokeshave until it is as round as possible.  Here the stock is in a vise which is a bit awkward -- remember she gave herself the present of a shaving horse which is now in her shop to make this process much easier and enjoyable!


Tuesday, September 15, 2015

September Meeting Tomorrow Night

Chairs  = 4 legs + a seat + a back + maybe an arm rest or two!


          Sounds pretty simple doesn't it?


Then why are they considered to be one of the most challenging projects a woodworker can take on?


Beth Wheeler may be answering that question at our monthly meeting tomorrow evening at 7:00 pm.


Beth will be our featured presenter and will share many of the things she learned at her recent class in Strasburg, Virginia.  The style of chair she made is based on Brian Boggs well known ladder back style and in this class taught by Jeff Lefkowitz, every aspect of making this style of chair was taught.  Look forward to Beth sharing her experiences that range from the initial selection of wood, shaping with drawknife and spokeshave,  steam bending, seat weaving, and more!

Along with her presentation we will also have our regular business meeting and a time for show and tell where we can share our latest project, tool, or tip with the group.  Remember to try and keep those presentations around 5 minutes to make sure we allow enough time for the featured presenter -- knowing Beth I'll bet she has a lot to tell us about!

As always, the meeting is open to the public so invite someone interested in woodwork to attend with you.  Since seating is somewhat limited it's recommended that you bring your own unless you're among the first and get one of the padded stools in Jamie's shop.  Time is 7:00 pm and we're usually done by 9:00 or so.  The address is 2267 West Gowan #106, North Las Vegas.  Call the studio at 702-631-1870 if you need any directions or have questions.  

See you there --- John

Monday, August 24, 2015

August 2015 Meeting

On a typically hot, August night more than 30 members showed up for our monthly meeting at John Eugster's (that's me!) house and shop.  Love these panoramic shots that Lupe took of the gathering, makes my shop look much larger than what it really is:


After our customary round robin introductions the business part of the meeting began.  There were quite a few new faces and I'm afraid I neglected to mention the blog when I introduced myself (seems my mind was elsewhere) so if you invited someone please have them contact me if they'd like to be added to the list.
We talked quite a bit about the AWFS show and the consensus seems to be that it appeared to be geared more towards large scale, computer driven industry then where we are.  Matter of fact, I just received and filled out a survey from them and complained about the lack of education geared towards single craftsmen and women like we are and suggested better classes like they had in the past.   As Jamie's experience with SuperMax and their poor customer relations at their booth pointed out -- it is worth the effort for us to voice our complaints. There was unanimous  agreement that the highlight of the show was the display Fresh Wood which featured student work from secondary and post secondary schools.
There were some positive comments too, Mike mentioned that the folks at the General Booth were very helpful and informative at that booth.  Others in the group mentioned that it seemed some of the booths at the AWFS show were manned by people that didn't seem to have the knowledge of the product or know much about interacting with potential customers.  As for a future show, Jamie announced that Lie-Nielsen is definitely going to have their tool event again this year at her shop.  That will be in October and they will have our own talented carver, Dennis Patchett, as a featured artist with a booth during their event!
     Most of us are familiar with Bessey Clamps as they advertise quite heavily in magazines and are also featured on some woodworking shows.  They recently sent a sample of them to Jamie for her test and evaluation.  She has been less than impressed with them and is wondering exactly how to evaluate them without being as blunt as she'd like to be!  Any of you out there that use them may want to shoot her an email about your own experiences with them too. 

Show & Tell

     We didn't have a lot of show and tell but what we had from Bill Patton was pretty spectacular.  We all know Bill as being a kidder but his pictures show that for all the kidding and teasing he takes, he is also quite accomplished at his woodworking.  He's been teased about how long it's taken to finish his desk but check out these pictures of it and accompanying cabinets:


Since we were visiting my shop, part of the show and tell has to do with the way I organized my work space.   In this picture is my bench area and what I refer to as the original pegboard -- a board with pegs!  I've had this at three houses and it's a 2x4 with a rabbet cut on top to hold a level and combination squares.  I've placed pegs to hold the most commonly used tools like planes, bevels, mallets, marking gauges, etc.  This way they're easily accessed for my work.  The Baltic Birch boxes on wheels below the bench is where clamps are stored.  Since I was doing joinery work the small workbench I bring to the meetings for demos is also clamped to the bench.  At the far side is the chisel cabinet which is near the door.  The door is one I made and allows me to get plenty of daylight to the bench.  Before, if the door was opened I couldn't get to that cabinet.  Now the sunlight streams in and the dog stays out!  The cabinet behind me is where I store supplies, you can't see it in the picture but there is a drop down section for my chop saw.  The drop down is sized so the chop saws table is level with the top of the cabinet which gives me a support on either side for longer boards.


Storing lumber and usable cut-offs is always a problem.  This rack is a bit over 4' deep and I can stand up some lumber under 9" in length.  The basket is for exotic scraps and there is a rack to the left where I store sheet goods.  Most of us probably don't have the luxury of storing a lot of lumber so someone said it best: "we store our lumber at Petermans!"


Featured Presentation

John's Armoire


Allow me to begin by saying that it's difficult to write all of this since it's me I'm talking about!  I'm proud of my work and my lifelong career as a teacher plays a huge part in wanting to share what I can with others -- that's really what it's all about for me.  The last thing I want to do is come across as boastful.  I appreciate your kind comments about the furniture and paintings in our home. Diane and I often joke that it's like we're living in our own little museum where everything (except the dog and cat) are for sale!


Hand drafted drawing
For starters I mentioned that furniture I build are pieces that I've designed myself.  I get inspiration from looking at other peoples work, magazines, museums, etc.  The inspiration for this piece came from Thomas Moser's piece he titled Dr. Whites Chest.  My design eliminated the monolithic appearance of his chest and added an Asian flair to it.  Like so many projects, the first designs were drawn on that proverbial napkin.  I use a Vemco drafting machine which those of you on the house tour saw to make a scale drawing of the piece.  I suspect that many of you are unfamiliar with what a Vemco drafting machine is so here's a LINK to one available on eBay.  For me, drawing it out by hand allows me to "build it" in my mind, something I can't seem to do if I try SketchUp or some other computerized program.  The over-all size of the chest is 74" tall by 19" deep and 48.5" wide.  I wanted to use traditional practices which included the draw bored mortise and tenon joints for the framework.  They were combined with handout dovetails on the lower, heavier stretchers.  Drawers again are traditional with dovetail joinery, solid panels for the bottom are of Alder, as are the drawer runners.  I started with 8/4 Genuine Mahogany so that I could resaw and get all of the wood from the same pieces of lumber.  Since I very seldom stain my work it's important to me to get as much of it as I can from the same boards.  This keeps the appearance of the piece as uniform as possible when the Danish Oil finish is applied.  Most commercial pieces are dyed or stained so for that the pieces of wood can vary since the stains will unify them.  As I mentioned, Woodworkers Source in Arizona is an easy 6 hour drive and great place where you can take your time selecting what you need.  My best estimate on time is 180-200 hours and the material costs were around $2,000 or less.  It took some time between other paying jobs to complete this project.

     I'm sure I didn't answer all of the questions about the building of this piece.  I blog most of my work  as an extension of my teaching so you can click on this  LINK to the blog entries dealing with  this Armoire. If that link doesn't work you can to my blog and type John's Armoire in the search block you'll get a listing of the blog entries.


Here are some of the pictures that Lupe took to illustrate the presentation.  In this one I'm showing the drawer stop which  aligns the drawer when it is closed.  The drawer itself is made of Soft Maple with the Alder bottom.  The bottom was laminated together from 3-4 pieces then surfaced to 3/8" or so.  It's rabbeted on the bottom side and slides into a 1/4" groove and is fastened with a screw in a slot to allow it to move with changes in humidity.


Jig for installing the 3 door butt hinges

Close up of hardware from Lee Valley

Jig used to locate the hardware (looks like the heat has gotten to me!)


Tuesday, August 18, 2015

August Meeting Invite

Well, let's start it out with this undeniable fact:


     Yep, if you're a long time desert rat this isn't too big of a deal -- we dress accordingly and drink lots of water.  Why start this announcement this way?  To quote Jamie, two words:  Field Trip! 
The field trip will be at my shop/garage which doesn't have any air conditioning other than opening the doors to capture any available breeze, I'll have a cooler full of chilled water and the temps shouldn't be much of a problem.   It's in the southwest part of town.

     As always the meeting will start at 7:00 pm with  our traditional round robin introductions.  Next up  will be our usual business meeting and show and tell of your latest projects, tools, or tips.  One of the purposes of a field trip is sharing how other shops are set up and utilize the often limited space most of us need to work around.  Hopefully my shop set up will give you some ideas for your own space.  The other part of field trip is sharing my latest project with you and talk about the design process I use.  Jamie gave me one heck of a build up in her announcement so rather than try to write my own I'll just steal what she wrote and copy it here……..


Since we all like to see how other woodworkers have their workspace set up, we invite you to join us for a rare treat - visiting a master in his own creative environment. Last month John showed us how to cut a  mortise and tenon joint using hand tools only and then draw bore it for added strength. There are 20 of those joints on the project he recently completed and will share with the group.  

Besides those 20 draw bored mortise and tenon joints there are another 20 that aren't draw bored; needless to say these were not all cut by hand like he demonstrated at the July meeting!  His goal was to utilize traditional techniques in the building of this piece.  John plans to share his approach to furniture design and some tricks he learned along the way as this very complicated project came to life.


I'm happy to host our August meeting at my shop.  Seating is pretty limited, I do have 4 padded folding chairs and and a couple of unpadded sawhorses so you'll probably want to bring your own seating.

Sunday, July 19, 2015

July 2015 Meeting

 On a typically warm, July evening we had about 30 members of the group show up for our monthly meeting.  After turning off the fan so we could hear, Jamie brought us all to order.

As usual, we opened the meeting with our traditional round robin introductions and there were a number of new faces -- Welcome!

Business of the Month

     The main item of business seems to be the AWFS fair that will be held at the Las Vegas Convention Center this week; July 22-25.  If for some reason you've forgotten about that you can still attend but the fees may be higher than the $25.00 admission.  If you've never gone it is truly something to see, as we've discussed a few times though, the classes and presenters aren't up to the same quality as previous years.
     Jamie recently ordered a switch for one of her tools which retired electrician Jim, offered to install.  The parts came from Delta and they also sent her some pens and t-shirts which Jim happened to be modeling for the meeting!
     One of our members, Andrew Tau;  talked about his successful Kickstarter project.  He shared how he used to be in woodworking but then life got in the way.  After the birth of his daughter 2 years ago he decided to build a crib for her which reignited his passion for woodworking.  The Kickstarter program is one where you develop a business model, build your product, and then "pitch it" on the Kickstarter website to attract investors.  His products are things such as coasters, cutting boards, and other easy to ship pieces.  According to Jamie, it's rare for a woodworking project to succeed but he managed to raise over $12,000 and 98 supporters during the two week run of his project. Here is a LINK to his work.  Hopefully Andrew will be able to leave his bartender job and pursue this full time.

Show & Tell

Dennis's Cottonwood Bark Carving
Show and tell session began with Dennis sharing this really unique carving done out of a piece of Cottonwood tree bark.  Dennis and Randy lead the Woodcarvers Group that meets at Woodworkers Emporium on the fourth Saturday of the month.  Here is a LINK to their latest newsletter so you can see the sorts of things they do and carve.  It's open to carvers of all levels and I can personally vouch for the talent in that group.  I've attended a few of the meetings and usually the members bring their chisels and work on projects during the meeting time.  This gives you an opportunity to ask questions and get some help so you can improve your own work. 
The Mouse takes the Cheese

Dennis also brought in this little mouse that "took the cheese"!


Beth's Steep Stool
Beth showed us this nice chair/step stool combination she recently made for one of her grand children.  The plans came from Popular Mechanics and it is made of Poplar.  The finish is a yellow milk paint protected with a liquid wax finish.  Great project for the grandkids to be sure.


     Braxton brought in a Pine box that featured hand cut dovetails.  It is his first attempt at dovetailing and they looked really nice.  Inside were many beverage cozies that we were welcome to take one of as the box made it's way around the room.  Unfortunately, we didn't get a picture of it.
   
Pete's Cutting Board
     Pete seems to come up with a different style of cutting boards every month!  This is his latest design that features inlaid strips of contrasting woods.  Rather than being straight and boring, these are curved and dynamic!  This design was featured in Fine Woodworking magazine, the pattern is used to route a shallow groove in the laminated board.  This is then cut on the bandsaw and routed smooth so you can glue in the curved, contrasting piece. You can see that Pete did this a number of times to achieve the pattern on this cutting board.

Denny's Cherry Table


     Hopefully, you all had a chance to check out Denny's latest project in the other room as it was too large to bring into where we met.  It's a Farmhouse style dining table made out of Cherry.  As you know, Jamie's woodworking style is one of speed driven quality.  She mentioned that Denny has been talking about his need for a table and on a recent trip to purchase lumber for the school she talked him into just doing it.  This table was built in about 20 hours under the direction/urging of Jamie.  Very nicely done!

Featured Presentation

Hand Cut Mortise & Tenon: John Eugster
     I volunteered to do this months presentation showing how to cut a mortise and tenon joint by hand.  As with all joinery the goal is to expose face grain surfaces that provide glueing strength.  This joint is used for almost everything you can think of like chairs, tables, cabinets, and doors.  Many ways to go about cutting this joint and one that I forgot to mention is a plunge router.  The mortise is the hole in the wood and the tenon is the portion of the joint that fits into it.  Most woodworkers start this joint by cutting the mortise first.  This can be layer out with pencil but the preferred way is to use a knife which will leave a much finer line and also sever the wood fibers which will guide your chisel.  In my demo, I used a dedicated pin marking gauge which is set to the width of the mortise chisel.
Mortise chisel, tape is used to show depth 
The advantage to the mortising gauge is that once set, it is used to mark out the tenon as well.  You should indicate the surface of the pieces being joined that the gauge registers on for marking.  
The work begins by holding the mortise chisel vertically and about 1/4" away from your line.  It's up to you to maintain 90 degrees while chopping.  The initial cut is made and then…..
….. the chisel is moved about 1/4" further and another cut is made.  You can now lever the chisel so that the chips come out behind.  The bevel on your chisel faces the direction of travel.  You can either start your cut at one side of the mortise and work your way to the other which is what I'm showing here.  You can also start at the center, work to required depth, and then go out to the sides from there.
Here the mortise is almost done except finishing up the left shoulder.
As the completed mortise was passed around the room you no doubt noticed that the bottom of it is pretty ragged.  In actuality that's not too critical because the strength comes from the face grain off the cheeks.  You can use a specialty chisel called a Swan Neck to make the bottom smooth.

Next up is cutting the tenon on the end of the other piece being joined.  This too is done with the mortising gauge and marking knives.  
The first cuts are the shoulder cuts and I use a chisel to deepen that line to help guide the saw.  Vision and good light are needed whenever you do precision hand tool woodworking.  I had a lot of comments about the headlamp I'm using which really helps.  It's from REI and you can recharge it with a USB port on your computer so batteries are not an issue.  Here is a LINK to it if you're interested.
After cutting the shoulders it's time to cut the cheeks.  I'm using a rip-cut dovetail saw.


There are a variety of ways to trim your tenon to fit the mortise.  You can use a chisel or a shoulder plane.  My tool of choice is either a rabbet block plane or a Stanley #71 Router Plane or newer model.


A process used to strengthen this joint and make assembly without clamps possible is called draw boring. The first step to this is to drill a hole through the completed mortise.  It's a good idea to place a scrap into the mortise to prevent the drill from blowing out inside.  Next you insert the tenon into  the mortise and mark the center of the hole.  This can be done with a brad point drill but I find that using a rod with a point that matches the diameter of the hole safer -- it eliminates the risk of enlarging the hole.
John Made tool
    When I inserted the dowel to draw bore my sample, it blew out on the bottom of the piece.  Not acceptable and as I thought about it driving home I think I know why that happened.  The hole probably wasn't square since I did it by hand.  In a recent project I had many draw bored joints and used a drill press to insure straight, accurate holes -- if possible that's your best choice.


Here's a picture of the completed sample joint. You can see that the shoulders are tight and the two pieces line up almost flush.  This is where you'd use a low angle block plane to even them out.


Thanks to Lupe's great video/photography you have this video to better illustrate the process.  Thanks for all the questions during my demo, hope it was beneficial to your own work.


Tuesday, July 14, 2015

July Meeting -- Wow, is the year already half way done?

     Time seems to be flying, as I typed in the month the reality of it hit me!  Seems like only yesterday we were having our end of the year Christmas happening.  Speaking of that, don't forget this years theme has to do with making a toy.  It can be for yourself, a member of your family, or given as a donation after the judging.  No limits this year on materials so be creative if you're into making toys -- I know some of you are!

     Not all of you that receive this blog are always able attend the meetings so let me remind you one last time about the AWFS convention that will be in Las Vegas the end of this month.  Here's a LINK to it should you want to see the schedule of classes and exhibitors and also sign up to go.  It's the largest woodworking convention in the country and will give you a chance to see all of the latest equipment and supplies.

     Our meeting is tomorrow (Wednesday 7/15) from 7:00 to ??  After the customary introductions we will have a short business meeting.  Be sure to bring in your latest project or information to share for the Show & Tell section of the meeting.  This is where you can spend about five minutes or so to inform, show, or tell the group about recent events in your woodworking life.

    It's always a bit awkward to talk about yourself so I'll use Jamie's announcement on MeetUp to set this up.  She said:  " …. one of our oldest members - (not age-wise, membership-wise!)  John Eugster will share his insights and techniques on one of the most popular joints out there - the mortise and tenon."   Hey, I'm not the only grey beard in the group!  In any case, the mortise and tenon is a joint that is used to make most everything from small cabinets to tables and even for timber framed houses.  I plan to go over the various ways the joint can be made and finish up with cutting one using hand tools only.  I will use a power drill though to demonstrate the technique of draw boring which makes this joint bullet proof and can eliminate the need for clamping.


As always, the meeting is open to the public so feel free to invite a friend, neighbor, or spouse to join you.  Seating can be limited so bring a chair if you'd like.  The meeting will be held at WoodItIs Studio and begin at 7:00 pm.  The address is 2267 Gowan Road Suite 106,  702-631-1870.


 Our next meeting is scheduled for Wednesday, July 15 at 7:00 where one of our oldest members - (not age-wise, membership-wise!)  John Eugster will share his insights and techniques on one of the most popular joints out there - the mortise and tenon. 
The mortise and tenon joint is one on the most widely used joints in woodworking, traditionally used in almost every piece of furniture or cabinetry.  There are a number of ways to cut this joint, and John plans on sharing his depth of knowledge about it, while showing us a trick or two. After a brief discussion of some of those ways, John will show how to cut this joint using hand tools. Like all hand work, it is a process but the more you practice it the easier it should become. (He’s still waiting for that moment!) 

Once the joint has been fit John will demonstrate a process called "draw boring" which will secure the joint forever.  This process adds a more mechanical method to ensure that the joint will hold forever and was used extensively in Shaker furniture construction. It also allows you to build with a minimum of clamps.