Thursday, April 19, 2012

Magical Wood Meeting Review


     At our April meeting we had quite an interesting presentation by Lupe Nielsen that covered many aspects of woodworking many of us may have never thought of.  The focus of her presentation centered around this extremely rare (one of eight known to exist) poster promoting an 1895 Magic Show by a famous magician of the time, Kellar.


1895 Poster ($15,000 and could be yours!)

     That's the teaser, let me re-cap the beginning of the meeting first.  It's always nice to see new faces at our meeting and last night was no different.  I got about half of their names and added it to the mailing list for the blog and announcements.  Have to hang my head, after sending out at least 3 announcements to all of you about the dues guess who forgot to bring them in --- yep, your's truly.  I'm sure Jamie will collect them next month.  Try to remember on your own because if I remind you guys again I'll probably forget my own.
     As is customary, we all went around the room with introductions and any brief recap to share what we've been up to with the rest of the group.  I noticed a few others had brought in some Show & Tell materials but we decided to hold them until after Lupe's talk.  That turned out to be a wise decision as Lupe had a very energetic and well planned talk to share with us.
     Take a close look at the poster, see the book with the owl sitting on it at the right?  The book is sitting on the stand that Lupe has spent much time designing and building and will soon be marketing.  Which version; well, she seems to be shooting for 3.0 at this point but we'll see!  It was quite enjoyable to hear the background and her point of view as to why this project came about.  Allow me to backtrack just a little.


The Star of the Evening (other than Lupe)

     Lupe started her presentation with a bit of background as to how she became interested in magic to begin with.  Seems that at 13 years of age she became involved with a theater company making the scenery and working back stage.  During this time she also became interested in something called Stone Lithography and the history of magic.  This was the connection that lead her to her future husband, Norm Nielsen, who is a well known magician here in Las Vegas and has one of the premier collections of magical memorabilia.  Not only have the two of them traveled the world performing their magic but they also have a business creating, making, and selling magic props and reproduction posters.
     Enter a company called Passion Books, they publish large and pricey, coffee table books (17 pounds, $200.00) on a variety of subjects.  They contacted Norm to see about getting some images for the book and although they had a half a million budget Norm and Lupe didn't give them free reign of their collection.  This book is filled with images and posters of magicians throughout out history and the world.  In a conversation with another magician, when Lupe mentioned that she was taking woodworking classes with Jamie it was suggested that she build the stand shown in the poster and market it as an ideal companion piece to the book --- the seed has been planted.

The Stand, The Poster, The Computer, and of course; Lupe

     Lupe's presentation was extremely well organized.  She's set a pretty high standard for the rest of us to follow but I won't be bringing in the computer when I get into cabinet scrapers in June!  When you check out the stand the legs are the most complicated and interesting feature of it.  They are made in two pieces and joined with a Festool Domino floating tenon machine.  To make them symmetrical templates were the way to go:

Leg Templates


     Lupe did a great job explaining the thought process and problems that will always occur when you build a project.  Doing a one of a kind piece you can "fly by the seat of your pants" a bit but since this will eventually be marketed and produced on a limited basis every step needs to be well planned out and documented.

The Top with Upgraded Tiger Striping 

     Nicely thought out wooden supports will hold the top at an angle so the book can be displayed.

It's really not that tall, Ted's on his knees!

     The part of the presentation that many of us were waiting for is how about the cost.  If you do custom work pricing is always a challenge.  Not too difficult to calculate material costs but the time factor is tough.  Most folks prescribe to the philosophy that says: "Time is Money".  I like Art Espenet Carpenter's take on it the says instead: "Time is Care".  Don't get me wrong, making money at this craft is very important but there needs to be a balance. I'm guessing that I'm not the only one who has missed a bid on a project and discovered you made less than minimum wage for it -- always a learning experience.  Because Lupe is planning to go into a limited production on these the time becomes a critical factor.  You have to balance what you want to earn on these to what the public is willing to pay for them.  
     I'm wondering if the rest of you thought the CNC costs were as interesting as I did?  Although I have the reputation of being a hand tool guy who uses power tools for the grunt work the whole technology in woodworking today is pretty fascinating.  I heard more than one person mention to just send the plans to China and let them work it out.  I know of business's that have done just that.  Lupe told us that a local CNC shop would do the set up and initial programming for the legs at $60.00 per hour and estimated roughly four hours time to accomplish that.  Once they have that done their hourly rate is $85.00 and they estimated they could produce about 12 legs in an hours time --- that's HUGE!!  As she mentioned, the first prototype took her about 85 hours to complete and obviously, the second, third, and so on will take less time as the process is learned but, 12 legs in an hour, no way.
     So, the bottom line is that as this project continues she's looking to produce a dozen of them with a retail price of $2450.00 which does not include shipping and handling.  For the person ready to buy a collectable book like the Magic Book this wouldn't be a stretch to add to their investment.  It's a really cool looking piece of woodworking and I think all of you would agree when I say "congratulations Lupe, you done good".
     
Lupe's Final Word

Tuesday, April 17, 2012

Lupe's Demo/Lecture Tomorrow

     Just reading the description of what Lupe plans to enlighten us with tomorrow night at our monthly meeting has me chomping at the bit -- love historical stuff and now she's going to add a bit of magic to the equation. We should all set the DVR for whatever drivel we may have wanted to watch on the tube and attend this meeting!

     Here; in an appropriate and fitting font for such an occasion, is her teaser:

     "Trials and tribulations of a rookie woodworker: Lupe's attempt to make a table based on an 1895 Strobridge Lithograph magic poster illustration, in a commercially viable manner, while keeping all her ten fingers intact, without driving her teacher crazy and being kicked out of the workshop. This talk is guaranteed to amaze, amuse and provide a good evening's entertainment to an otherwise very boring and dull Wednesday night."


     Hope everyone can make it.  Please remember to bring you $20.00 for the yearly dues, that money is used for our MeetUp site and prizes and refreshments for the end of the year Christmas party.  Should you have something that you'd like to share with the group remember we have a time of Show & Tell.  Members have told me that this is a good ice-breaker and it opens up communication between all of us.

See you then -- John

Saturday, March 31, 2012

My Choice for Hand Creme!

   
     This whole thing was started by Jamie's comment a while ago and now Dennis has become our "crash test hand guy" for the product so generously donated after Jamie's post.  Well, I mentioned that I bought the hand creme from Home Depot and am glad they have a no questions asked return policy!  It left a sticky film on my hands -- yeech!
      Years ago my doctor recommended this creme in the photo.  The reason was that it doesn't contain a ton of water like most lotions do.  It's not cheap but I'd recommend getting the larger container with a screw on top.  It's about $15.00 but......this stuff works and is odorless.  It's very thick and you just need a little.  I'm an old fashioned teacher that used chalk (never went to the marker boards) and you combine that with sawdust and our dry climate this Eucerin is the way to go.

     John gives it a rousing 5 stars and two thumbs up and you know that as a woodworker of my age having those two thumbs is a good thing !!

Friday, March 23, 2012

Lamb's Tongue and Other Happenings

     Our monthly meeting was held at Rich Daugherty house in his beautifully equipped and laid out shop.  Many of us made the field trip and I'm sure were impressed with not only Rich's demo but also with the lay-out and collection of tools.  While we were waiting for the meeting to begin, we socialized and just talked wood amongst ourselves.

Here's the thing.......

Somethings got us chuckling!

Dovetail Lament (do 'em by hand)
     We had some normal business to take care of before Rich started his demo, one of them had to do with the yearly dues for the club.  Jamie will collect them at the next meeting and at $20.00 for the whole year I'm sure you'll agree it's a bargain!  Remember too that if you do a demonstration you can waive the dues and possibly have two chances for the end of the year drawing during our Christmas meeting.
     Jamie was looking for the person with the roughest hands and for some reason she picked on Dennis.  He is our official "smooth hands" Guinea pig for a product called Helping Hands.  A representative for the company saw a blog Jamie had on trying to find a good creme/lotion for working hands and generously sent a bottle of it -- I guess Dennis will have to start a daily blog and have random neighbors evaluate the condition of his hands!  Jamie mentioned another product available at Home Depot which is called Working Hands.  It's made by O'Keeffe's and I have it on my typing digits as we speak.  Found it in the paint department.
     Ted, who's pictured on the right in the top photo, told us about an upcoming swap meet that will be held in the parking lot of Woodworker's Emporium on Arville.  The date is Saturday, March 31 and the time will be from 9-12.  It sounds like a good way to get some money for those tools you're not using plus an opportunity to pick something up that you may want.  In any case, it'll be an opportunity to mingle with other woodworkers and talk wood with one and other.
    For show and tell, I brought in the acanthus leaf I carved in the workshop with Ian Agrell.

     The workshop was a 5 day one and this honestly took about half of that time.  It's all hand work, no sanding and an hour or so was spent drawing -- definitely not my strong suit.  It's a piece of African Mahogany which Dennis told me he'll avoid at any cost because of the interlocked and otherwise crazy grain.
     Before the Rich started his demonstration he showed a few books that he enjoys.  One that seemed to generate a lot of interest is authored by Jim Tolpin, an author I've been aware of for at least 30 years.  He goes through a series of projects and exercises designed to hone your hand tool skills.  Many of the things he covers are ones that I taught in traditional classes that were called Industrial Arts.  Here's an Amazon link to that book, it has the Look Inside feature so you can see what's in it for yourself.
     Rich also showed the layout and rational as to how he designed his shop.  On one wall there is a collection of plywood panels and he has a variety of tools mounted to that with French cleats.

Tool Storage Wall
    Then, someone just had to ask what he had in his drawer's and to quote Lupe, it was just "Frickin' Amazing!"

     Richard is one of the hand tool aficionados' of the group.  I happen to fall into that category as well but if you're more into power tools it was really educational to see what he had and how they were used.  As an example, here is what's called a hold fast.  A fairly simple tool to hold your work without the use of a vise:

Hold Fast
     As the name implies, it holds your work fast (in this case a Kreg Jig) by simple putting it into a hole on your bench and securing it with a tap from your mallet.  If you ever decide to get one the quality of the steel is important.  There are some cheap, cast ones that'll break when you try to get them to hold.
     Let's talk about his demonstration.  A Lamb's Tongue is a decorative way to end a chamfer.  It's much more elegant than just stopping it short.  Here are some of the tools he used to accomplish it:

From Left; Float, Chisel, 2 Auriou Rasps, Carcass Saw, Stanley #90 Rabbet Plane
Although it didn't show up real good, there is a lamb's tongue cut on the board and you can just barely make out the pattern he made to draw it onto the board.


Additional Tools

     You know how they say a picture is worth a thousand words?  Well, thanks to Lupe a video is worth much more than that!  Here's a link to the video she made that is now on YouTube: http://www.youtube.com/watch?v=PxVi8-nLPfM

     Essentially the process is to first lay out the profile with the pattern and waste out the majority of the wood with a saw.  This can then be smoothed with either a rasp or float.  Since the tongue profile is laid out on both sides a series of cuts are made with the backsaw to the layout lines.  Chisel and mallet is used to rough out the profile which is then completed with files, rasps, or floats.  Carving chisels can be used as well but your objective is to make a smooth, decorative end point for your chamfer aka A Lamb's Tongue.
     I'm sure I'm speaking for all of us when I give him a big Thanks!  Great demonstration and it was good to see one of our members shop.  Maybe we should have field trips more often, anyone want to volunteer their shop?

Tuesday, March 20, 2012

Tomorrow's Meeting (3/21)

     This is to remind all of you about our meeting which will be held at Rich Daugherty's shop.  His address is 5201 Jay Ave.  89130.


Our next meeting will be on March 21, at the normal time: 7:00. BUT - this meeting will be held at Rich Daugherty’s woodshop, which is located at 5201 Jay Avenue, Las Vegas 89130.


These are his directions:


From Cheyenne and Rancho, go north to Jay Avenue.  There's a church on the corner of Rancho and Jay which is your landmark for the turn.  If you get to Gowan you've gone a block too far, but you can turn right on Gowan, go east to Thom, turn right and go one short block to Jay and run right again.  Jay also goes through to N. Decatur.


     He will be cutting a lambs tongue so if you're not too sure as to what the heck that is, this meeting will be a good one to learn about that.  Personally, I can't wait to see his shop with the bench he's building and especially his collection of tools.  Hope to see you there, last meeting we had a few of the members bring in smallish sized projects they had recently finished.  The Show & Tell session went well and I think everyone enjoyed seeing what was brought in.  If you have something you'd like to share bring it with you.


Sunday, March 18, 2012

Info about our March meeting

Two words - FIELD TRIP!!!

Sin City Woodworkers, a Vegas valley social and networking group committed to serious (and not so serious!) woodworking discussions, meet on the third Wednesday of each month to share everything from techniques and ideas to information about local suppliers and much more. We usually meet at Studio: Wood It Is! but this month, we’re changing things up a bit.

Our next meeting will be on March 21, at the normal time: 7:00. BUT - this meeting will be held at Rich Daugherty’s woodshop, which is located at 5201 Jay Avenue, Las Vegas 89130.

Rich is planning on doing a demo of cutting a lambs tongue on the end of a stopped chamfer, as he did with his 17th century Moxon twin-screw vise. It's a big chamfer in maple, and he’ll use a carcase saw, chisel & mallet, float, chisel plane, and his secret weapon - Auriou rasps. Rich is a tool aficionado, and his shop is probably full of more goodies than a Lee Valley store, so you’ll definitely want to join us!

Rich sent along these directions:


From Cheyenne and Rancho, go north to Jay Avenue. There's a church on the corner of Rancho and Jay which is your landmark for the turn. If you get to Gowan you've gone a block too far, but you can turn right on Gowan, go east to Thom, turn right and go one short block to Jay and run right again. Jay also goes through to N. Decatur.

Hope to see you there, this is going to be an interesting one!

Thursday, February 16, 2012

Tabled at the Meeting

Waiting by the Heater
     The monthly meeting of the Sin City Woodworkers for February was well attended in spite of our chillier than what we've become used to , weather.  Thankfully, Jamie had fired up her propane heaters so several groups of us were gathered around them, keeping warm, until the meeting started.
     The focus of this meeting was Tables, specifically how to attach the tops to the leg and apron assembly.  Jamie explained how you must take the movement of the wood into consideration.  You can't just screw or, heaven forbid, nail that top down tight!  Living here in the desert, the seasonal swings of humidity aren't much of an issue but if you've ever brought a piece of wooden furniture from a different climate, chances are pretty good that it has developed splits and cracks as the lack of humidity here causes the wood to shrink.  This shrinkage and expansion occurs across the grain of the wood and is pretty substantial.  So the problem is the wood moving in width, not length.  Now, how do you deal with this when you're planning to make a table.
     If the table top is relatively small, like say on a plant stand; you can probably get by if you elongate the hole for the screw used to attach the top.  When you do that though you can't be Joe Knots on the screw!  It needs to be snug enough to hold the top in place but not so tight that it prevents that seasonal movement.  A store bought counterpart to that would be what's referred to as a figure 8 fastener.  Although there isn't a picture to illustrate it, you can imagine a piece of metal in that shape.  One end is fastened to the apron and the other to the top.  The holes are large enough to allow a bit of movement.

Shop Made Buttons or Wooden Clips
     An excellent but time consuming way to attach the top is this shop made method.  You can see the 10 buttons/clips attached to the bottom of the top.  These ride in a dado cut into the tops of the aprons.  Basically, this piece is a step with a countersunk screw hole.  The thin part of the step is inserted into the dado and then screwed to the top.  That inserted step is long enough to allow the top to expand/contract as it wants.  Although time consuming to make, these add to the craftsmanship of the piece.  You can make a stepped blank long enough to cut many buttons out at a time.  The time comes in as you drill, countersink, and then sand them for that quality look.  It's important that the grain runs the long way for strength.

Metal Z-Clips
     Here Jamie is showing how metal z-clips are inserted into a saw kerf in the apron.  This is probably the easiest, quickest way to solve the table top mounting issue.  These clips are available from local as well as on line sources.  You can see the saw kerf that she cut at the top, inside of the apron.  About the only way you can fail with this system is if you forget that kerf before you assemble the legs and apron!
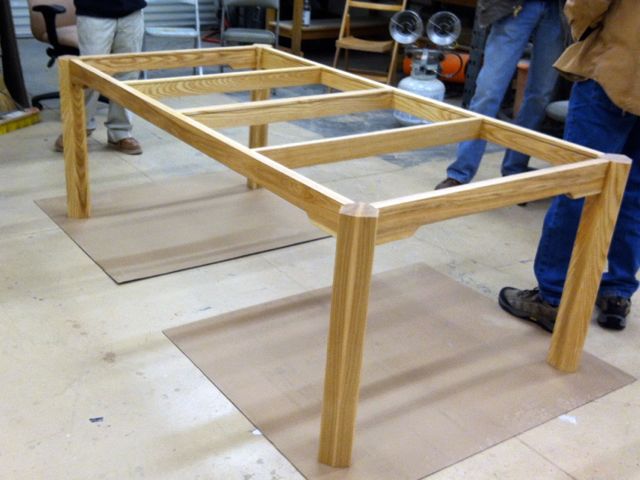
     To illustrate these things Jamie had two, beautiful table bases to share with us.  Both were made of 8/4 Ash and different in their design and construction.  In case you missed the story behind this one:

Trestle Table
     She had originally done a similar table for a client, the design inspiration is from the Hilton sign.  That commission was made out of Mahogany and since she needed a table and kind of liked this one she made a copy for herself.  Well, you know how woodworkers can be -- what looked good on paper and in our heads sometimes changes.  This one's on Etsy but if you want to save on shipping you could probably pick it up from her.  This example can be "knocked down" to make it easy to move.  She demonstrated how the fittings are installed and work.  They're the 6 black circles seen on the side.
     The other table she used was this one:

Ash Apron and Legs
     This one too is made of 8/4 Ash but it's not a knockdown design and about 7' long!  When you build a piece like this you better plan first if you can move it to where you want it to be, No spiral staircases for this one!  You'll notice that the apron is relieved towards the middle but left as wide as possible where it's mortised and tenoned into the legs.  That's where you want the strength but in the middle you want room for peoples legs.  The legs on this table are beautiful.  They started out being 5 sided which is pretty unusual but then when the facets were cut on the outsides they became a 6 sided design.  The inspiration for them came from this book:

     The picture has some glare but the title is Creating Coffee Tables and here's an Amazon link Creating Coffee Tables  if you're interested in adding it to your library.
     The other book that Jamie referred to for design parameters and concepts is actually available from Amazon as well, however; at $135.00 a copy you may want to explore the internet for free resources, there are many practical design books available that are probably a tenth of that cost.  If you want to check it out though, here is the Amazon link to Seth Stem's book.
     Another activity we enjoyed at this meeting was seeing some of our members work and collections.  Allison brought in her unique project:
Allison's Secret Jewelry Stash (shhhh!)
     This was a really well constructed, half lapped, Oak frame which also doubles as a mirror.  We're sworn to secrecy but it's a clever concept.  This is the rear view of it and you can see how she's used a mesh to hold earrings with a French hook.
     Neal has been busy trying his hand at carving and shared this project with the group:
Basswood Plaque
    Many of you may remember that he's recuperating from a pretty nasty accident and has taken up the challenge of carving to keep his sanity!  All agreed that this is a very nice piece.
     Ed brought in this plane, another part of his sons yard sale find in the Carolina's:
Ed's Plane
    This style is known as a Transitional Plane and was manufactured by the Stanley Company.  Today we might refer to it as a hybrid.  It was to help woodworkers transition from using a wooden bodied plane to a steel one.  Kept the wooden sole but added the metal parts to adjust and hold the blade.  If you handled it you may have noticed that if you're hands were large it didn't fit!  I know people were shorter in the 1800's so it would stand to reason that their hands may be smaller too.
     We ended the evening with Ted's Treasure Trove:
Beautiful, just Beautiful
     Ted told us that he's been collecting and gathering tools since he was a teenager.  Many of the younger members of the group have probably never been exposed to the beauty of old tools.  The beautiful brass objects in the middle of the table are plum bobs.  They've been replaced by lasers and a double duty chalk box that functions somewhat like a plum bob does.  You can see trammel points, a glue pot, old style molding planes, a brace, and Rosewood and brass level.  The beauty of these tools is that now they're almost considered to be a work of art with the engraving and designs cast into them.  A far cry from the mass produced, Chinese imports that fill the big box stores today.  Ted mentioned that he could probably bring stuff for a year and never show the same thing twice.
     All in all, a very good meeting and I think everyone would agree.  It was nice having people bring stuff in to share with the rest of us.  As always, I'm going to encourage you all to plane a demonstration to share with the rest of the group.  Many have stepped forward so don't be bashful -- besides if you do it'll save you the $20.00 dues for the year.