Thursday, October 27, 2016

Pull up a chair!.. it's our October meeting re-cap!

We had a cozy meeting this past month - an intimate gathering where there was good discussions on a wide variety of topics. 


And even better - a few new faces in the crowd!


Longtime member - Neal brought in a few projects he's been working on. He's been bitten by the carving bug, and constructed a carving bench to raise the height of his work when carving on a traditional-height bench. You can get a PDF plan for it by clicking here. 


This Bench on Bench plan has been copied and re-engineerd a zillion times, but its original design by Jeff Miller is a true masterpiece in functionality.  Neal added a Veritas clamping system that works well with 3/4" bench dog holes that came from Rockler, and says this bench perfectly suits his needs. He designed it to sit at elbow height, for comfortable ergonomic use.  


He also brought in this wall cabinet, made of oak with handmade molding. It features adjustable shelves, a


 raised panel door,


and a drawer below. He's been dabbling and practice a lot of techniques in his retirement, and those talents are certainly reflected in these pieces. He deserves an "attaboy" for these!


Next up, Beth brought in yet another one of her complex chairs, this time a two-board chair inspired from a 1600-1700 design. As she explained what went into this piece, we marveled at her tapered sliding-dovetailed seat, 


and the ability for this chair to break down via dovetails and removable tusk tenons.  


The legs were splays out at an 11 1/2 degree angle, and slide into place. 


On top of that, she darkened them with her torch and scorch method, providing some fabulous contrast to the rest of the chair. 

 The through-tenons really added some visual interest, and


the double-heart design cut into the back provided a whimsical touch to this traditional-styled chair,


 As always - great job Beth! 


Her enthusiasm and sheer determination to become a better woodworker should inspire all of us! The chair was finished with her favorite - Tried and True oil, and glowed with rich color.  This was one very sweet chair. 


On to the main presentation - changing jointer blades. As I explained - when I first started changing jointer blades, it was an all-afternoon ordeal, often taking hours to get the knives set at the correct height. There a countless methods for installing knives, and just about that many jigs that you can buy or make, to hasten the process. But it really doesn't have to be that complicated! Just these simple tools and a straight block of wood will allow you to switch out your blades with a fairly high degree of accuracy.  


In this case, I needed an allen wrench and a box wrench. 


When I first learned to switch out the blades, I'd follow the tool manual's advice and remove the guard and back fence. I've learned that's not really necessary - both slide out of the way to give full access to the cutterhead.


But first, I like to check the indeed and outfield table with a straightedge, to ensure that both are parallel.  


If they're not parallel, it's a pretty simple adjustment to get them into alignment.  But there is one HUGE thing to know... when adjusting that bushing (the round thing on the left of that handle) there are TWO set screws locking it into place. The first time I tried to get the table planes into adjustment, I couldn't figure out what loosening the set screw didn't allow for adjustment. Imagine my surprise when I found a second set screw underneath the first one! 

So - remove the top one, and then loosen the second and you'll be able to adjust your two tables into perfect alignment by rotating that bushing. The manual recommends using a spanner wrench, but I just use Channel-locks and they work fine. 


Onto the blade replacement -  I've learned to take each blade out and replace it immediately, lest I run the risk of dropping the small parts into the jointer black hole of death.  

Loosen four small bolts that apply pressure to the gib and the blade pops out easily.

 I usually blow out the sawdust and debris, and re-insert a blade. All that's left is adjusting it to the proper height, and for that, I use a straight piece of wood, which is kinder to the newly sharpened knife than using a metal or magnetic jig.  


Here's a little video to show this technique much better than I could write about it! (As always - thanks to Lupe for being our staff photographer and videographer!)


Sunday, September 25, 2016

Holy Mola!... this was a terrific meeting!


There was a gorgeous rainbow over the woodshop - perhaps it portended what a great meeting we had in store for September. Everyone settled in as we discussed a few things on the agenda - the Christmas party project,


 and a few show-and-tell pieces that members brought in to share. 


Neal made it a point of saying that he has given up working on cars, and moved into carving.  From what we saw, he made a great decision; his work is delicate and gorgeous.


John brought in a few bowls that he was giving to Lupe, who discussed her new online business adventure  - the Artisan Wood Market.  Her plans include featuring work by many local artists, and then branching into marketing these wares to local buyers. She has a talented and diverse group of woodworkers within our group, that's for sure. 

These bowls will join a growing inventory of pieces, both large and small, that will hopefully sell well during the holiday season. 


Our featured speakers were Cindy and Marylou, who started LazerLadies in North Las Vegas and offer full service layering engraving services.  


After eight years in the Air Force, MaryLou was inspired to start a full service company after seeing a need for military gifts, trophies and mementos in our town.  Along with their "secret weapon" - Papa (AKA, their father Ramon), these sisters offer laser engraving, screen printing, embroidery and custom woodworking, selling their wares worldwide. 


They brought a variety of their products, explaining that their four Epilog laser engravers  create a variety of military pieces, serving a much needed niche in the military community. 


About 90% of their sales come from the Department of Defense, and the fact that their company is veteran owned and operated is a huge advantage when working with the military community. 


And although they started with the idea of serving this community, they've branched out into many more areas, creating personalized pieces for the general community including schools and corporations. 


This jet was way cool! 


And the detail on this piece was amazing. 


Papa came up with this sweet little wooden base which holds a lasered flask and two shot glasses. It's precisely custom gifts like this that give the LazerLadies a great reputation for being able to come up with the perfect gift for anyone, regardless of their interests or status. 


This coin holder opens up to reveal a (lasered!) bio for the recipient, 


and one of his military coins. 


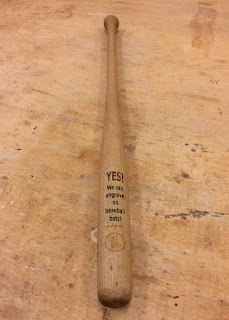
And YES.... 


they can even do baseball bats!


The main purpose of having them as our featured guests was to introduce their services to our woodworking community, and as our meeting came to a close, we all checked out Lupe's latest creation - her massive "Mola" Bookcase made of Cherry.  

As always, she wowed us with her impressive furniture making, but what made this piece particularly special was how she personalized it with laser engraved panels in the lower doors. 


Inspired by Panamanian Mola quilted designs, 


she hired the LazerLadies to engrave her door panels.  

As Lupe explained in a detailed write-up of her piece, "Molas are pieces of embroidered artwork made by the Kuna Indians of Panama. These depict themes from nature - mostly animals and plants. I picked two elements that would look graceful on the doors: a fish and a sea turtle."


Our Sin City Woodworkers group has been around going on eight years, and Lupe is certainly one of our more inspired and motivated members. And this meeting embodied what we're all about - sharing talents and techniques, and networking with other woodworkers. A big thanks to Cindy and Marylou (and Lupe too!) for bringing this all together. 


Tuesday, August 2, 2016

A Bittersweet Farewell to John...

It was a warm night, but some of our dedicated members met to give John Eugster a proper send off. John's been a long time member of our group, and he's moving to Arizona to start a second chapter in his life. 


As always, we started the meeting with our introductions, and a few members shared some things they brought. Eric brought some samples granite, explaining how he sharpens on the stone for a perfectly flat bevel on his chisels.


With just some simple wet or dry sand paper, you can sharpen chisels quite efficiently. One of our new members, Michael, walked away with a piece of the stone, and I'm sure he's already gotten a pretty good edge on his chisels.


As always, you never know who's going to pop up at one of our meetings, and we were delighted to have the owners of California Pacific Specialty Woods, who came by to talk about their products and services. Their mill is located in Red Bluff, California and they sell a variety of slab and log products. 

Need a claro walnut live edge slab? 
Or some Oak for a live edge table?
No problem!  Their website has a huge selection of slabs, lumber, turning blanks, gunstock and more. Check out their lumber page here.

On to more business... we talked a bit about the Christmas party, and what we would be choosing for our woodworking contest. From the sounds of things, the theme of this year's holiday contest will be BoxMaking. I'm sure that will work out much better than last year's toy making contest.  (That was a dud.)

It was fitting that John brought his Canarywood chair that he'd built many years ago - for it was this exact chair that we was working on when we first got to know him. 
John began the discussion on reinventing himself as a woodworker in Arizona talking about his older work - like this chair,


 but explained that transitioning to a smaller woodshop meant that he's now working on smaller pieces - mainly picture frames. As most know, his wife Diane is a fine artist, specializing in painting, and John is her main frame-maker. 

John explained that "A frame is just a frame; the painting is the star" but I'd have to disagree - John's frames are works of art in their own right.  In most cases, John starts with poplar or basswood, machining the stock into a frame profile, and then carving a variety of motifs into the wood. 


Celtic knots and bougainvillea leaves are popular, but he tries to match the frame to each painting. He starts by making some basic design template, 


and then transfers it to the wood using dividers.  The BIG trick is owning enough chisels that one needs to make each cut! 


This Art Deco frame, and many others, feature gilding, in which gold leaf is applied to the wood. John explained the differences between real gold leaf and composition gold leaf, which was much cheaper, but had a very different appearance.


 His gilding techniques is laborious - and includes sizing with a clay base, gilding the actual metal to the wood, and then a variety of finishing layers that include shellac, steel wool, wax and a final rottenstone polish.


 No wonder some of John's frames sell for what they do!


As always, it's sad to see people leave our woodworking community - but we wish John and Diane all the best in their next chapter of life. Thanks for the memories, and all the enriching discussions that you shared with us - we'll miss you!