Monday, August 24, 2015

August 2015 Meeting

On a typically hot, August night more than 30 members showed up for our monthly meeting at John Eugster's (that's me!) house and shop.  Love these panoramic shots that Lupe took of the gathering, makes my shop look much larger than what it really is:


After our customary round robin introductions the business part of the meeting began.  There were quite a few new faces and I'm afraid I neglected to mention the blog when I introduced myself (seems my mind was elsewhere) so if you invited someone please have them contact me if they'd like to be added to the list.
We talked quite a bit about the AWFS show and the consensus seems to be that it appeared to be geared more towards large scale, computer driven industry then where we are.  Matter of fact, I just received and filled out a survey from them and complained about the lack of education geared towards single craftsmen and women like we are and suggested better classes like they had in the past.   As Jamie's experience with SuperMax and their poor customer relations at their booth pointed out -- it is worth the effort for us to voice our complaints. There was unanimous  agreement that the highlight of the show was the display Fresh Wood which featured student work from secondary and post secondary schools.
There were some positive comments too, Mike mentioned that the folks at the General Booth were very helpful and informative at that booth.  Others in the group mentioned that it seemed some of the booths at the AWFS show were manned by people that didn't seem to have the knowledge of the product or know much about interacting with potential customers.  As for a future show, Jamie announced that Lie-Nielsen is definitely going to have their tool event again this year at her shop.  That will be in October and they will have our own talented carver, Dennis Patchett, as a featured artist with a booth during their event!
     Most of us are familiar with Bessey Clamps as they advertise quite heavily in magazines and are also featured on some woodworking shows.  They recently sent a sample of them to Jamie for her test and evaluation.  She has been less than impressed with them and is wondering exactly how to evaluate them without being as blunt as she'd like to be!  Any of you out there that use them may want to shoot her an email about your own experiences with them too. 

Show & Tell

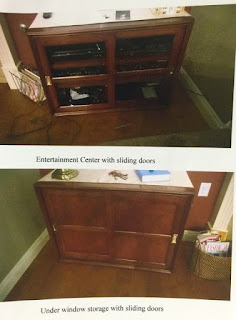
     We didn't have a lot of show and tell but what we had from Bill Patton was pretty spectacular.  We all know Bill as being a kidder but his pictures show that for all the kidding and teasing he takes, he is also quite accomplished at his woodworking.  He's been teased about how long it's taken to finish his desk but check out these pictures of it and accompanying cabinets:


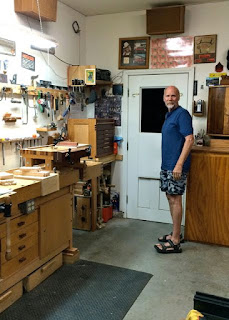
Since we were visiting my shop, part of the show and tell has to do with the way I organized my work space.   In this picture is my bench area and what I refer to as the original pegboard -- a board with pegs!  I've had this at three houses and it's a 2x4 with a rabbet cut on top to hold a level and combination squares.  I've placed pegs to hold the most commonly used tools like planes, bevels, mallets, marking gauges, etc.  This way they're easily accessed for my work.  The Baltic Birch boxes on wheels below the bench is where clamps are stored.  Since I was doing joinery work the small workbench I bring to the meetings for demos is also clamped to the bench.  At the far side is the chisel cabinet which is near the door.  The door is one I made and allows me to get plenty of daylight to the bench.  Before, if the door was opened I couldn't get to that cabinet.  Now the sunlight streams in and the dog stays out!  The cabinet behind me is where I store supplies, you can't see it in the picture but there is a drop down section for my chop saw.  The drop down is sized so the chop saws table is level with the top of the cabinet which gives me a support on either side for longer boards.


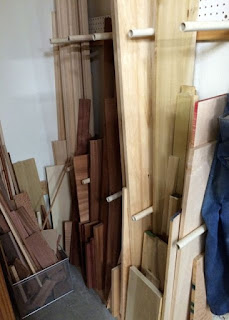
Storing lumber and usable cut-offs is always a problem.  This rack is a bit over 4' deep and I can stand up some lumber under 9" in length.  The basket is for exotic scraps and there is a rack to the left where I store sheet goods.  Most of us probably don't have the luxury of storing a lot of lumber so someone said it best: "we store our lumber at Petermans!"


Featured Presentation
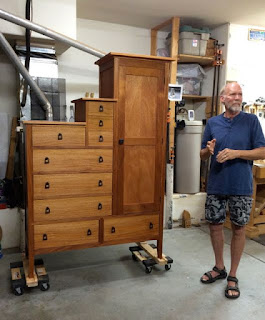
John's Armoire


Allow me to begin by saying that it's difficult to write all of this since it's me I'm talking about!  I'm proud of my work and my lifelong career as a teacher plays a huge part in wanting to share what I can with others -- that's really what it's all about for me.  The last thing I want to do is come across as boastful.  I appreciate your kind comments about the furniture and paintings in our home. Diane and I often joke that it's like we're living in our own little museum where everything (except the dog and cat) are for sale!
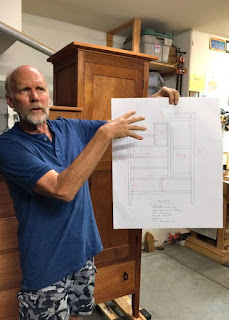

Hand drafted drawing
For starters I mentioned that furniture I build are pieces that I've designed myself.  I get inspiration from looking at other peoples work, magazines, museums, etc.  The inspiration for this piece came from Thomas Moser's piece he titled Dr. Whites Chest.  My design eliminated the monolithic appearance of his chest and added an Asian flair to it.  Like so many projects, the first designs were drawn on that proverbial napkin.  I use a Vemco drafting machine which those of you on the house tour saw to make a scale drawing of the piece.  I suspect that many of you are unfamiliar with what a Vemco drafting machine is so here's a LINK to one available on eBay.  For me, drawing it out by hand allows me to "build it" in my mind, something I can't seem to do if I try SketchUp or some other computerized program.  The over-all size of the chest is 74" tall by 19" deep and 48.5" wide.  I wanted to use traditional practices which included the draw bored mortise and tenon joints for the framework.  They were combined with handout dovetails on the lower, heavier stretchers.  Drawers again are traditional with dovetail joinery, solid panels for the bottom are of Alder, as are the drawer runners.  I started with 8/4 Genuine Mahogany so that I could resaw and get all of the wood from the same pieces of lumber.  Since I very seldom stain my work it's important to me to get as much of it as I can from the same boards.  This keeps the appearance of the piece as uniform as possible when the Danish Oil finish is applied.  Most commercial pieces are dyed or stained so for that the pieces of wood can vary since the stains will unify them.  As I mentioned, Woodworkers Source in Arizona is an easy 6 hour drive and great place where you can take your time selecting what you need.  My best estimate on time is 180-200 hours and the material costs were around $2,000 or less.  It took some time between other paying jobs to complete this project.

     I'm sure I didn't answer all of the questions about the building of this piece.  I blog most of my work  as an extension of my teaching so you can click on this  LINK to the blog entries dealing with  this Armoire. If that link doesn't work you can to my blog and type John's Armoire in the search block you'll get a listing of the blog entries.


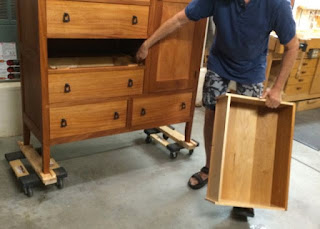
Here are some of the pictures that Lupe took to illustrate the presentation.  In this one I'm showing the drawer stop which  aligns the drawer when it is closed.  The drawer itself is made of Soft Maple with the Alder bottom.  The bottom was laminated together from 3-4 pieces then surfaced to 3/8" or so.  It's rabbeted on the bottom side and slides into a 1/4" groove and is fastened with a screw in a slot to allow it to move with changes in humidity.


Jig for installing the 3 door butt hinges

Close up of hardware from Lee Valley

Jig used to locate the hardware (looks like the heat has gotten to me!)


Tuesday, August 18, 2015

August Meeting Invite

Well, let's start it out with this undeniable fact:


     Yep, if you're a long time desert rat this isn't too big of a deal -- we dress accordingly and drink lots of water.  Why start this announcement this way?  To quote Jamie, two words:  Field Trip! 
The field trip will be at my shop/garage which doesn't have any air conditioning other than opening the doors to capture any available breeze, I'll have a cooler full of chilled water and the temps shouldn't be much of a problem.   It's in the southwest part of town.

     As always the meeting will start at 7:00 pm with  our traditional round robin introductions.  Next up  will be our usual business meeting and show and tell of your latest projects, tools, or tips.  One of the purposes of a field trip is sharing how other shops are set up and utilize the often limited space most of us need to work around.  Hopefully my shop set up will give you some ideas for your own space.  The other part of field trip is sharing my latest project with you and talk about the design process I use.  Jamie gave me one heck of a build up in her announcement so rather than try to write my own I'll just steal what she wrote and copy it here……..


Since we all like to see how other woodworkers have their workspace set up, we invite you to join us for a rare treat - visiting a master in his own creative environment. Last month John showed us how to cut a  mortise and tenon joint using hand tools only and then draw bore it for added strength. There are 20 of those joints on the project he recently completed and will share with the group.  

Besides those 20 draw bored mortise and tenon joints there are another 20 that aren't draw bored; needless to say these were not all cut by hand like he demonstrated at the July meeting!  His goal was to utilize traditional techniques in the building of this piece.  John plans to share his approach to furniture design and some tricks he learned along the way as this very complicated project came to life.


I'm happy to host our August meeting at my shop.  Seating is pretty limited, I do have 4 padded folding chairs and and a couple of unpadded sawhorses so you'll probably want to bring your own seating.