Saturday, December 22, 2012

Christmas 2012


Founder and Leader of the SCWW -- Jamie
     We started our meeting on a cold, December evening at Jamie's studio/school, Wednesday the 19th. This marks the fourth year for our group and it's great to see how we've survived!  People have come and gone which is to be expected in any organization but I think we've all benefited from our monthly meetings, demonstrations, and getting out of our self-imposed isolation as woodworkers!  As you can see, there was some libations (no tools = Okay) and treats which we all enjoyed.

Raffled Items
     We started off with a drawing for some donated items that you can barely see on the table.  There were two boxes of Bench Cookies (non-edible), Richard and Eric each scored a box of those.  And then some vise grip clamps for a drill press which was won by Cal.  Next was the big event as far as the drawings go.  With monies from our dues, Jamie purchased several gift cards from Lee Valley which I'm guessing ranks pretty high as our favorite toy store.  Son of a gun ---- I was a winner with a $25.00 gift certificate.  The other lucky winners were:  Chuck -- $50.00; Jamie -- $50.00; and the top award of $100.00 went to Dennis.

     Besides the drawings, libations, and socializing another aspect of this meeting is for the members to bring in and share their projects.  This is a great time to see what we do when we're off in our shops.
Russ showed us this beautiful 4 panel, room divider that is made of Cherry and Cherry plywood.  He mentioned the plywood and needing to keep track of which side is the A and which side is the B!  Beautiful example of mortise and tenon joinery:
Four Panel Screen
     Ed, who's been working away on his bargain basement lathe, brought in what he referred to as a "one board bowl":
One-Board Bowl
     I don't know if it was the libations or what but I had a tough time grasping the concept of how this bowl was made.  Ed said the process came from a guy by the name of Malcom Tibbets so here's a LINK to his website so you can get more information.  Now, I'm going to go out on a legal limb here.  In spite of Woodcraft Supply sending me their Cease & Desist Letter: 

Merry Christmas John, from Woodcraft

    I also found this video produced by them showing the process Ed employed to make the bowl, here's the LINK to that.  Anybody know a cheap lawyer?

     A new member, Percy brought in this carving he recently completed.  It's done on Maple which is pretty hard on the tools, and is a combination of power tools to rough out the design followed by hand work:
Percy's Rose Carving
          Many were interested in his website, here's a LINK to that for you.

     Rich, who's been a member for quite some time brought in a P-51 Mustang and told us about a DC-3 aka as a C-147 he recently completed for a airplane mechanic that specializes in vintage, military aircraft:
Rich's P-51 Mustang
     Besides my "science fair project" style of the legal problems Woodcraft sent my way, I decided to show this apartment sized wine cabinet:
John's Wind Cabinet
     It's designed to hold 3 bottles horizontally and 4 Merlot sized glasses.  The doors are done with Radio Weave caning.  Many of you were interested  in the hardware used to secure the doors.  It's actually a casement latch:

Rat-Tail Latch
     So, here's a link to where I bought it:  http://www.houseofantiquehardware.com/window-hardware-rat-tail-casement-latch

     Our final presentation was made by Ted.  He does some fantastic work and has shared the building of a custom Oak staircase he's been working on in Utah.  You may recall his demonstration this summer on pattern sawing with the table saw and the making of the tapered posts.  Obviously he couldn't actually bring it in but did share some photographs of it:

Ted's Staircase & Plumb Bobs

     As you know, he's also a bit of a tool junkie -- hmm, that may be an understatement!  He's holding a huge, English style of plumb bob and brought in a number of them from his collection of approximately 120 which are displayed on a Plumb Bob Tree in his house.  The oldest is a stone one from the 14 or 15th. century but most date from the mid-1800's to the 1950's.
     You can also see a sampling of his moulding and other planes in the background.  The largest is a 3" crown moulding plane plus various other shapes and sizes.  Of particular interest to me was a really nice scrub plane from Holland that I just couldn't fit into my pocket!  Many of these planes were custom made by the user, often of a hardwood like Maple inlayed with boxwood at the wear points and even homemade blades of old files.
     The meeting ended with socializing, stories, and several tried out the planes that Ted brought in.  A couple of sore arms later they were singing the praises of the electric router and shaper!
So Quiet & Peaceful

Assorted Planes
      I'll end this final blog of the year with a:


Merry Christmas to all, 

and to all a Good Night!!

Happy New Year


Tuesday, December 18, 2012

The Day You've Waited For!


HO HO HO TOOLIES!
     It's Christmas time in the Wooditis shop located way up in the north of Las Vegas!  Our end of the year get together to celebrate not only Christmas but also 4 years of Sin City Woodworkers has arrived.  Normal time, 7:00 pm and the same wonderful location which is 2267 West Gowan, unit 106.

     If this is your first Christmas get together we will have drawings for fabulous gift certificates plus an array of door prizes.  If you should have something you'd like to donate for that door prize drawing do bring it in -- who knows, that thing you have gathering dust may be just what someone else needs.
   
     The format for the meeting is different from the others we have during the year.  The shop will be relatively dust free which you know is pretty hard to achieve in a woodshop!  Bring in a project you've made during the year if you'd like to share it with us.  I know some of you have made things that are way too large to bring in but bring photos of your work.  Some of those that come to mind might be a staircase (hint/Ted) or a console table (hint/Dave) and that's only a few this Santa has on his list!  It's a great time to mingle and start up conversations about the project, gives us a chance to pick everyone's brain and learn about techniques that are new to us.  Also gives us a chance to find out what other members woodworking preferences are.

     This is a meeting where you're encouraged to bring even non-woodworking guests!  There should be some goodies out there to munch on and feel free to add to that as well.  There are quite a few members who have been with the Sin City Woodworkers for the entire 4 years and, thanks to Jamie's' efforts we're still going strong!


See you tomorrow at 7:00 pm


Monday, November 26, 2012

Pre-Thanksgiving Meeting 2012

Beautiful Cherry 
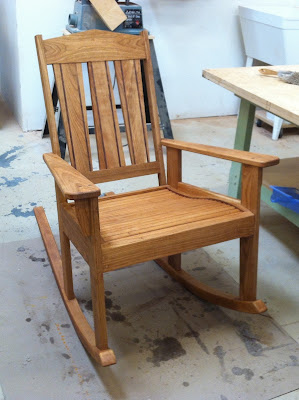
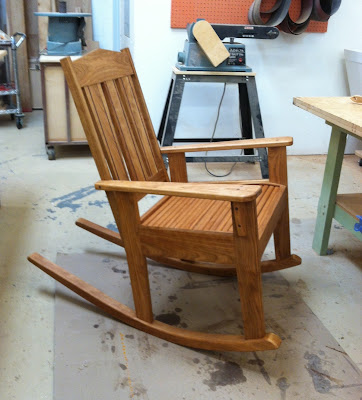
     The two pieces you see here are the featured, and rightfully so, projects that Lupe discussed with us at our meeting last Wednesday.  Before we got into this beautiful rocking chair and table we had our business end of the meeting.  As is customary, our round robin introduction of the 17 people who attended revealed that there were 4, brand new first timers!  This is really great, Jamie and I had considered the possibility of not having a meeting at all since it fell on the day before Thanksgiving.  Glad to see that interest keeps growing for the Sin City Woodworker group.
     Our next meeting is the end of the year, Christmas edition.  This is a time to bring a guest/spouse/significant other but probably not your pet canary.  What we do is cover the tables with some festive Christmas paper and then bring in a small project you're working on or want to show off and share.  It's a great way to start conversations and get to know one and other better as we mingle around the room, asking questions, getting tips, etc. about our work.  There will be drawings for gift cards and also for various items brought in for raffles.  Feel free to bring in any goodies that you'd like as well.  That meeting will be on Wednesday, December 19 so mark your calendars.
     Before Lupe's presentation a few of the members brought in some show and tell items.  First off was Jonathan with his bench hook:

Jonathan and his Bench Hook
     ….. these are great shop items to have around whether you're working on your bench or off the tailgate of your truck when installing some trim work at a job site.  Reminded me of my teaching days, it was a project my students would do to learn basic squaring skills.
     No, that's not our version of Thor and his mighty hammer.  It's Dave showing off the mallet he made out of basically scrap materials he had in his shop.

Dave aka Thor
     He had come to my shop for some dovetail lessons armed with a rubber, dead-blow mallet. After trying my wooden one decided that was the way to go and created this beauty, here's a close up of it.

Hard Maple, Walnut, & Brass Accents
     Ted brought in one of his many plumb bobs, he actually has a Plumb Bob Tree at his house with several hundred of these brass beauties hanging from it.  These are beautiful tools that unfortunately have been replaced by electronics.
   
Woodworkers Sobriety Test??

     On the bench besides him is a 3" wide Crown Molding Plane.  He's promised to bring it and possibly some others to the Christmas meeting for us to try out.  Molding planes like these have been replaced by routers and shapers but they still have a place in small scale work.  Using them requires some muscle and straight grained materials.  From what I understand, when a crew came to build a house "back in the day", the finish guys would immediately pick out the straightest grained lumber to form all of the baseboard, crown, wainscot, etc. needed for the job.

     On to the evening's feature presentation by Lupe.  When Lupe began her talk, Jamie gave her a great introduction.  For those of you that are fairly new, her husband Norm, is a well known magician and the two of them collect magic posters and create magic tricks for others.  Here's a LINK to their website, it's well worth checking out.  Also, go to YouTube and put Norm Nielsen in the search bar to see quite a number of video's featuring his work.
     Something Lupe said struck a chord with me, she said that her goal was to learn a new skill on every class or project she does.  That's a great way to keep ourselves motivated and not become complacent in our craft.  These projects were an off shoot from classes at Jamie's school.  Another thing she mentioned is that she has learned that wood is an imperfect material and every project becomes a process -- boy, isn't that the truth!

Warming up the Crowd
   The material for both of these is Cherry that she bought at a fantastic price of $2.25 per board foot from Toys for Smiles.  Here's a view of the table with the top removed.  It features mortise and tenon construction.  Lupe's impetus for this project is that she wanted to use the Hollow Chisel Mortiser in Jamie's shop so a table making class fit the bill!  Another new Do-Hickie she learned to use was a tapering jig needed to taper all of the legs.  If you check out her rocking chair you'll see she really likes that Do-Hickie because nearly every surface has been tapered.  This table will serve as a computer/printer stand in their office and mounted on casters so it can be moved as needed.  Adding the drawer to keep needed supplies is a great touch.  This was her first attempt at flush fitting drawers and that's a good technique to use.  By cutting the drawer front out of the apron board and then gluing it all back together you achieve a continuous grain pattern that's much nicer than the random one found in most mass produced furniture.

Computer/Printer Table with Drawers

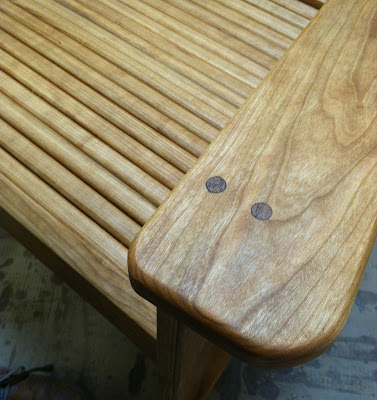
     Let's get into the rocking chair.  It began life as a child sized rocker and the plans needed to be re-sized to suit adults.  She employed the design process of making cardboard patterns to visual and measure the angles required when you make a chair.  I think you'll agree that the seat was a really nice feature, it's made in a tambour style which you most commonly find in a roll top desk.  I like the process so much I may just have to steal it!  It began with making a pattern and adjusting it so that it was the perfect match for an adult sized, human butt!

Ah yes -- the Butt Rest

     Once the cardboard was perfected a Baltic Birch template was made.  Here's where she learned the new technique of pattern routing.  Pieces were selected for the left and right side of the seat, cut out on the bandsaw and then the template was attached so a router with a pattern bit could cut them both exact.  The pattern bit was swapped out for a grooving one, the pattern was unscrewed, and then re-attached lower so a groove could be made to slid the tambour pieces into.  To make the tambours a router bit formed the edge first and they were then cut to the required size on the tablesaw.  Many of the members  tested the chair and all agreed it was a real comfortable one to sit in.
     Another aspect of the chair design is figuring out the exact arc of the rockers.  Lupe found a chart on line that helped with this dilemma.  Needless to say, both rockers need to be exact and located under the center of gravity to work properly.

Rocker Arc Chart
     Both pieces were finished with Watco Danish Oil, hand sanded with multiple coats applied.  Lupe's number was 6 coats or until your finger tips are gone!  Here's a few more pictures of the chair.

Real Life Testing -- It Passed

     Notice the grain pattern on the crest rail?  This is where custom work really shines, being able to select the wood to enhance the piece.  Tapering the slats and adding a Walnut inlay is another very nice touch.

Front View


Very Graceful

Seat Close-Up & Arm Detail

     So, that brings us to the close of another great meeting.  Mark your calendar for our Christmas Meeting and end of the year party.  That's the 19th. of December --- see you then!

Tuesday, November 20, 2012

Forget Basting the Bird --- Wednesday Meeting


     Several of you have contacted me as to whether or not there would be a meeting this Wednesday, the day before Thanksgiving.  The definite answer is YES!   So forget about scrubbing the toilets, vacuuming the rug, polishing the mirrors, and all that because this will be much more fun, informative,  and entertaining!  Usual time, 7:00 until we get done shooting the breeze.  If you have something you'd like to share as well bring that too.
      If you're in the habit of bringing a chair make sure it's a comfortable one because our featured presenter is Lupe Nielsen.  She really set a high standard for presentations a while ago when she gave us her talk and slide show (powerpoint for you up-to-date guys) dealing with the presentation table for the book about magic.  She took advantage of the Cherry that Toys for Smiles was selling and after buying a hundred board feet, wondered what the heck to do with it.  She first made a rocking chair which was loosely based on plans from an early issue of Fine Woodworking Magazine.  If she can pry her husband, Norm, out of it she'll have it at the meeting.  I'm told it's such a favorite of his he may be part of her presentation!
     Along with the chair she's been taking additional classes with Jamie learning skills such as pattern routing, tapering, drawers, and building tambours.  If this presentation is anything like her previous one, we'll be in for a treat.  So, get your pre-Thanksgiving chores done early and plan on being at WoodItIs tomorrow night -- See you then.


By the way, here's a link to a video I got this morning.  You may find it helpful after Dennis did his demonstration on cutting coves on the table saw.  That technique created lots of interest from everyone there and this video may refresh your memory and help you try it on your own.

http://www.popularwoodworking.com/video/making_cove_video?et_mid=590607&rid=3358535

Let me add this, I've done this using a dado blade of about 1/4" wide and it works well too, no flexing to score the wood as much.  As a teacher I always had chalkboard erasers which made a great sanding block but those may be hard to come by these days!  You can also vary the size of the cove by using different diameter blades.


Friday, October 19, 2012

Blog for Wednesday, October 17th.


Only the Shadow Knows What Lurks
Below the Ninja Turtle Blankie !!


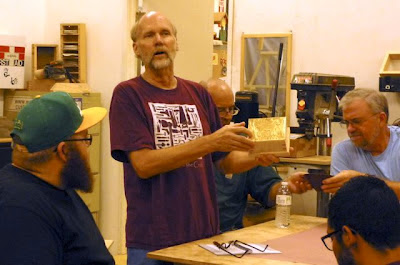
     The meeting started off with a mysterious looking object, front and center in Jamie's school/shop this Wednesday.  As you can see, most of the hardened woodworkers in attendance didn't seem to be overly concerned about it's presence and did what we usually do at the beginning of a meeting -- get caught up on the past month's activities.

We Ain't Askeerd!

     We started out with our traditional go around the room introductions and it was nice to see that we had 3 or 4 new faces, welcome to the group.  After the introductions Jamie mentioned that we're only a meeting away from our Christmas, end of the year event.  The third Wednesday of December is the 19th. so that probably wouldn't interfere with Christmas plans however; the third Wednesday of November is on the 21st. which is the day before Thanksgiving so that meeting will more than likely need to be changed.  Email either me or Jamie with your thoughts on that so we can re-schedule it.  On second thought, Jamie is probably the most important one to contact since she has to have her school schedule clear on whatever day we can have that meeting.
     Jamie asked Ted for a follow up to the complicated balusters for a stair job he's been working on in Sandy, Utah.  These are made of White Oak and featured a four sided taper.  You may recall he demonstrated how to do pattern sawing on the tablesaw to accomplish that.  He mentioned they're pretty much done but he's headed back to Utah mid-week to complete them.  In the meantime, he also mentioned the current job that consists of Baltic Birch countertops on three sides of a room.  Ted brought up the fact that although this is 13 ply, genuine (i.e. not Chinese Crap) the face ply is quite thin and tends to delaminate easily.  I helped him on the installation of this and he showed me how using Frog brand yellow tape does prevent a lot of chipping when we scribed the counters to the walls.


Ted Giving Us His Follow-up


     Another item Jamie asked for follow-up to was the box show that I had last month.  First off, I appreciate those of you that were able to come and support my work.  I know that several of you had other plans that evening but stopped by the Urban Ranch Store the following week to see it.   There were some sales so that was great but I also got some exposure to more local "potential clients"  which is always a good thing.  A goal I had was to establish an Etsy store with these boxes and eventually other items that are easier to ship than the furniture I'd prefer to make.
     This brought up a discussion of what the heck Etsy is.  It's a great place for gift shopping, you find all sorts of one of a kind, unique items made by genuine craftsman/artist folks.  Jamie is an Etsy Pro and has been on it for quite some time with lots of sales; me, I'm a novice and just keeping my fingers crossed!  Here are links to our shops:


     Jeez, I'm getting too much ink this time but I wanted to bring in a marking gauge I recently made for Show & Tell.  No one else brought in something to share, next month okay?  Judging by the reactions from many of you who tried it as it was passed around, it's a success.  I know I really like the way it feels and handles.  A large part of that is due to the cutting blade I found on-line.

   
     A number of you expressed quite a bit of interest in the marking gauge I made and asked about its construction. Here is a LINK to the construction of it from my blog.  After all of the rains we had there was one tweak needed and that was to replace the wooden friction button I had made with one from UHMW polyethylene, here is the LINK to the blog showing how that was accomplished.  Should you want to make your own version of this and have some questions feel free to email or give me a call.

     Okay, on to the main event and to find out what was lurking under that Ninja Turtle Blanket.  Before all was revealed, Eric Felder gave us a history lesson about the Shakers but more about the school he went to in Kentucky.  This school is run by Kelly Mehler and here's a LINK to it if you're interested in finding out more.  It's located in Berea, Kentucky where you'll also find Berea College which is a work/study college.  What that means is that students receive tuition there but must qualify for placement by being in the lower 40% of the national income level.  Kelly was a product from that college and decided to set up his own school near by.

All is Revealed
     Eric received the tuition needed to go there as a present from his mother-in-law.  He was duly impressed by the amount of greenery and humidity on arrival to Kentucky which plays a huge part to his presentation!  If you're unfamiliar with the furniture of the Shakers or their history they were what was referred to as a separatist community, in other words, they kept to themselves and lived by some pretty strict guidelines.  They were very practical, most of you are probably familiar with the Shaker Pegs.  These were a place to hang chairs on the wall so the entire floor could easily be swept.  Personally, I really like their style of furniture and incorporate it into my work, here is a LINK from Wikipedia to let you learn as much as you want about them on your own.
     According to Eric's talk, the shop was equipped with the most modern and up to date machinery available.  The instructor encouraged everyone to make the table using methods they were unfamiliar with rather than sticking to something you already know how to do.  The table is built using traditional joinery methods such as dovetails and mortise and tenons.  I thought it interesting that Kelly told the class he'd just as soon have an end of the class bon fire of the finished projects!  His emphasis was on them learning new skills rather than walking away with a completed project.
    Eric worked a different section of the table each day, basically, it was built from 4 pieces of wood. The problem arouse when the completed parts were shipped via UPS from humid Kentucky to arid Las Vegas.  Now we know why we design and build with humidity changes in mind!  That drawer that fit well during the dry fit in Kentucky now couldn't begin to slide into its space.  The once nicely tapered legs now splayed out and the top ----- forget about that, it turned into a nice board to hide the spot where the drawer was to go.  Eric's wife wants him to re-purpose the table into something  usable but he'd just as soon it self destructs and is hidden from view.
   
Construction Details
Here are some of the details found in this piece:

  • Tapered Legs (2 sides)
  • Half Blind Dovetails for Drawer Rails
  • Wooden Blocks to attach the top that are set in a groove.   This allows the top to float with seasonal changes
  • Mortised & Tenoned Legs/Aprons


Dovetail Project Pieces
     Eric brought in a few other pieces to show as well.  On the table here you see a pair of dovetailed boxes or drawers.  The one in the rear has a problem or two, I felt as if I were looking at a drawing made by one of my favorite artists M. C. Escher and I don't only like him because he's Dutch like me!  If you're interested in honing your skills, practice pieces like these are the way to go.
     Another item brought in was a School Box that Eric made while at the Marc Adams school in New York.   This is one of the projects that Christopher Schwartz encourages hand tool woodworkers to take on in one of his many books and blogs.


School Box
     It's good to see an interest in building with wood and taking account all of its properties.  The IKEA attitude and mass produced furniture prevalent today utilizes lots of sheet goods and some construction methods that are unconventional.  Unfortunately, we live in a "throw away" society so much of the mass produced stuff of today is yesterdays news.  Don't mean to get on a soap box but I like tradition and quality.
     So, next meetings date is up in the air.  Contact Jamie with any thoughts you have on that and let's see more of you bring in something for a show and tell session.


Tuesday, October 16, 2012

Wednesday, October the 17th. We Meet Again!


     Before I go into the meeting reminder I wanted to share this Shellac update with those of you that use it.  I shared the dating system that Zinsser uses to  show the manufacturing date of their products.  I also mentioned my belief that it was good for either 6 months or a year from that date -- WRONG!   Here's a response I got from them:


John,
Our Shellac finishes actually will have a shelf life of three years. The Sanding Sealer that you have mentioned, Lot # S16026D, would have been made in June of 2011.  This would make the expiration of the product in June of 2014.
If you have any additional questions or concerns please do not hesitate to contact us.

Sincerely,
Jason K.


     So, let's talk about the meeting.  You remember Eric Felber's presentation on sharpening techniques a few months back?  Well, even with all of the research he did on that he still found the time to make a side table in the Shaker Style.  There must have been some interesting developments during its construction because Jamie decided to title his presentation:

Disaster, Humiliation, and Redemption; 
The making of a Shaker Style Side Table

I don't know about you but that sure piques my curiosity!  Plan on being there to learn the back story, wonder if it has any resemblance to Hunter Thompson's  Fear & Loathing book?

See you Wednesday at 7:00 pm


Wednesday, October 10, 2012

Swap Meet Reminder


    As promised, here's a reminder about the swap meet that will be in the parking lot of Woodworkers Emporium.  Their address is 5461 Arville and phone is 871-0722.
    It's this Saturday (10/13) from 9-Noon.  Haven't been there before but you could call them about what you need to do if there's something you'd like to sell.  Ted tells me there are some tables and people sometimes will lay stuff out on the ground.  
     Okay, enough of this computer stuff -- I need to make some sawdust!

John


Wednesday, September 26, 2012

Tool Sharpening

    Good morning all, I just wanted to take a minute to tell you about a business I've been working with for my saw and other cutters sharpening for quite a while now.  They are located in Salt Lake City so the only downside is that you'll need to mail your blades, shaper cutters, and router bits to them.  The upside is that they do excellent work and if you have a question they will call you up to answer it.  It's been getting harder and harder to find a good source of sharpening here in Las Vegas.  Woodworkers Emporium used to send their blades to them but that's been years ago so not sure what happened.
     In any case, they are called Accurate Carbide and here is a LINK to their website.  Just to give you an idea of costs, I UPS'ed two blades to them for about $12.00.  For a typical carbide combo blade, 10" x 40 teeth they charge $16.40.  I had some concerns about them and Chuck called me personally to answer the questions I had.  Turn around time is about a week but you can plan around that.  What I do is rotate three blades, one is beyond sharpening so when the two good ones get dull I put it on the table saw and use is while the others are out.  I really dulled them for the box series where I used lots of exotic woods!  As I work in my shop I'll set aside any other cutters that need to be sharpened and send it all at one time to save on shipping.
     I learned about them at one of the big woodworking shows.  I use Tenryu blades and the factory reps in that booth recommended them for sharpening their blades.  Check them out, they may be just what you need.

Sunday, September 23, 2012

Photo's, Video's, and The Meeting Blog


Waiting for the Main Event

     We had roughly 23 members at our meeting last Wednesday, September the nineteenth.  The weather is improving and so was the comfort level inside Jamie's shop which was perfect as we had lots of demonstrations and valuable information. These are things we can try in our own shops, seeing them demonstrated in person helps to understand what to do.  As is customary, we went around the room for our brief intro's and there were about 3-4 new faces -- welcome!
     Before the scheduled demonstrations we had our show and tell session.  Starting off with Ed, who brought in his latest lathe project, this segmented turning:

Ed's Segmented Bowl

     If you've ever used a lathe one of the important things is making sure your wood is securely fastened to the faceplate -- flying wood is never good!  Ed brought in an adjustable faceplate that he found plans for and made himself.  The rubber items that securely fasten the wood are bathtub stoppers.
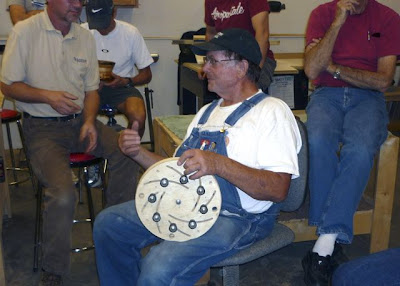
Longworth Chuck
     For any of you that are interested in seeing how this chuck works and/or want to make your own, here's a LINK with plans for making it.
     In keeping with the wood turning theme, Don (president of the woodturners group)  brought in his latest bowl design which is really pretty amazing.

Don's Bowl

     To create this design he started out with a  3/4" x 7"  piece of Leopardwood.  This was cut into circles that were tapered and got progressively smaller.  The tool used for that is the bandsaw.  After cutting they were run through a sander to prepare them for the next step which was to glue them back together into a conical shape.  Finally, this is attached to a faceplate and Don worked his magic and skills to produce the bowl you see here:

Completed Bowl
     Quite often, the things we make in our shop reflects where we are in our life situation.  Some of us can look back on what Jonathan has been working on and remember doing that for our families and others of you may have this phase to look forward to.  He's been working on child related items like this neat Cow Jumped Over the Moon piece:

Hey diddle diddle, the cat and the fiddle, the Cow jumped over the Moon ...
     Apparently what started out for his own kids ended up as a must have for neighbors, cousins, and so on.  That's the fun part of being able to create these things.  To help him create more efficiently and accurately, Jonathan also brought in his recently completed drill press table.  Jamie was quick to offer her drill press as a place to set it up and evaluate but he declined.
     Last of the show and tell session was the boxes that I brought to share.  I was asked to do a show of them and have been busy making 29 different examples.  This kept me pretty busy coming up with something different from what you usually find.  The show was last Thursday and will be up at the Urban Ranch General Store until the end of next week.  I really appreciate those of you that were able to come to by, check out all of the work, have some wine/beer and snacks, and just be supportive.  Thanks for that and the purchases some of you made as well.
One of the Gilded Dog Series

     Trying to get recognition and market your work is a pain for me but it was lots of fun to come up with the unique box designs.  Got to feed my wood addiction!

      We had two really informative demonstrations at this meeting.  The first was with Dennis who showed us how to make an Ogee, bracket foot.  As with all of these demonstrations he made it look pretty easy but that's only because of his experience in making these.  It is something that all of us can do, seeing it "up close and personal" is so much better than pictures in a book.


 Making the cove began with a piece of 8/4 stock and templates.

Template Drawn on End

Template for Side

     In actual practice Dennis would use one piece of wood for each pair of the feet.  You start with adjusting the height of the blade for the depth of cut needed.  He then counts the number of revolutions as he returns the blade below the table.  After setting up the fence, he'll return the blade to that height in small increments.

Double-Stick Tape to Secure Fence

     The fence used to guide your cut is attached to the tablesaw at an angle.  Different diameter blades will give you a larger or smaller radius on your coves which determines the size of your molding or, in this case, cabinet foot.  You could use clamps but Dennis's chose is this 3M brand tape he gets at CTI here in Las Vegas.  There was a lot of interest in this store and the tape so here's a LINK to them, they are located at Valley View and Hacienda.
     After making the required passes to achieve the depth of the cove, the next step is to cut the shape on the bandsaw.  This can then be sanded with either a spindle sander or by wrapping some sandpaper around a piece of dowel.
Refining the Curve
      By using a block plane the edges are chamfered and brought to the desired profiles.  The piece shown above is a sample, in practice it would have been long enough for both sides, mitered and joined to form the complete foot.
     Lupe did an outstanding video which can be seen on YouTube, here is a LINK to that video.  I'm somewhat computer challenged so let me know if this doesn't work for you and I'll try to figure it out.  The video is really informative and will show you much more than I could write.
     Next up was another outstanding demonstration from Ted.  He's doing a staircase up in Sandy, Utah out of rift sawn, white Oak.  The newel posts are made by having a four sided taper that starts at about 7"  wide and goes up to 4" or so.  The style of them is an Asian/Craftsman one and hopefully he'll take some pictures of the completed project to share when the job's done.  Since there were a number of posts to make it was well worth the time and effort for him to make a perfect template to follow.  I've enhanced this picture to try and clarify it so no, you don't need to adjust your set!

Template for Newel Posts

     The piece on top is the template and it is perfectly centered on the piece needing to be cut out.  You can see how the template piece has brackets screwed to it that go around the needed part.  These are screwed into the top and bottom of the post sides and will be capped over on top, bottom you won't see.  If you've ever done pattern routing with a hand held router or on a shaper, this is the same concept.  The first step is to clamp a T-shaped fence (called an Overshot Fence) to the tablesaw rip fence.

Installing the Overshot Fence

     There is ample space between the piece being cut off and the rip fence to insure nothing will bind and be shot back at you.  There's also space between the top of the piece being cut and the overshot fence.

Adjusting for the Cut
     The outer edge of the blade is in line with the fence.  As the template is guided against it the results will be a perfectly matching part.  Where a router or shaper uses a bearing, the edge of this fence serves the same purpose.  To assemble these parts the edges next had to be cut at an angle which was accomplished by tilting the blade.  Next up was to move the fence to the opposite side of the blade, lower the blade and cut a slot in each mitered edge to accept a spline for glue up.  Ted said that to hold these together for the glue up all he needed was masking tape across the edges.
     Once again, my words and Lupe's photographs aren't enough to really describe this process but Lupe has made another great video showing Ted in action on YouTube.  Here's the LINK to that one as well.  Lupe is doing a great job on these, if you agree tell her so next time you see her.
     Well, this one (or me!) got to be rather long winded but there were a lot of good things happening, shared, and discussed at this meeting.  Last thing I'll add is that there will be a swap meet in the parking lot of Woodworkers Emporium.  It'll be on Saturday, Oct. 13 from 9am to noon.  From what I understand you can bring in your stuff to sell without any charge or comission.  Until next month, or maybe sooner, that's all for now!