|
| Waiting by the Heater |
The monthly meeting of the Sin City Woodworkers for February was well attended in spite of our chillier than what we've become used to , weather. Thankfully, Jamie had fired up her propane heaters so several groups of us were gathered around them, keeping warm, until the meeting started.
The focus of this meeting was Tables, specifically how to attach the tops to the leg and apron assembly. Jamie explained how you must take the movement of the wood into consideration. You can't just screw or, heaven forbid, nail that top down tight! Living here in the desert, the seasonal swings of humidity aren't much of an issue but if you've ever brought a piece of wooden furniture from a different climate, chances are pretty good that it has developed splits and cracks as the lack of humidity here causes the wood to shrink. This shrinkage and expansion occurs
across the grain of the wood and is pretty substantial. So the problem is the wood moving in width, not length. Now, how do you deal with this when you're planning to make a table.
If the table top is relatively small, like say on a plant stand; you can probably get by if you elongate the hole for the screw used to attach the top. When you do that though you can't be Joe Knots on the screw! It needs to be snug enough to hold the top in place but not so tight that it prevents that seasonal movement. A store bought counterpart to that would be what's referred to as a figure
8 fastener. Although there isn't a picture to illustrate it, you can imagine a piece of metal in that shape. One end is fastened to the apron and the other to the top. The holes are large enough to allow a bit of movement.
 |
| Shop Made Buttons or Wooden Clips |
An excellent but time consuming way to attach the top is this shop made method. You can see the 10 buttons/clips attached to the bottom of the top. These ride in a dado cut into the tops of the aprons. Basically, this piece is a step with a countersunk screw hole. The thin part of the step is inserted into the dado and then screwed to the top. That inserted step is long enough to allow the top to expand/contract as it wants. Although time consuming to make, these add to the craftsmanship of the piece. You can make a stepped blank long enough to cut many buttons out at a time. The time comes in as you drill, countersink, and then sand them for that quality look. It's important that the grain runs the long way for strength.
 |
| Metal Z-Clips |
Here Jamie is showing how metal z-clips are inserted into a saw kerf in the apron. This is probably the easiest, quickest way to solve the table top mounting issue. These clips are available from local as well as on line sources. You can see the saw kerf that she cut at the top, inside of the apron. About the only way you can fail with this system is if you forget that kerf before you assemble the legs and apron!
To illustrate these things Jamie had two, beautiful table bases to share with us. Both were made of 8/4 Ash and different in their design and construction. In case you missed the story behind this one:
 |
| Trestle Table |
She had originally done a similar table for a client, the design inspiration is from the Hilton sign. That commission was made out of Mahogany and since she needed a table and kind of liked this one she made a copy for herself. Well, you know how woodworkers can be -- what looked good on paper and in our heads sometimes changes. This one's on Etsy but if you want to save on shipping you could probably pick it up from her. This example can be "knocked down" to make it easy to move. She demonstrated how the fittings are installed and work. They're the 6 black circles seen on the side.
The other table she used was this one:
 |
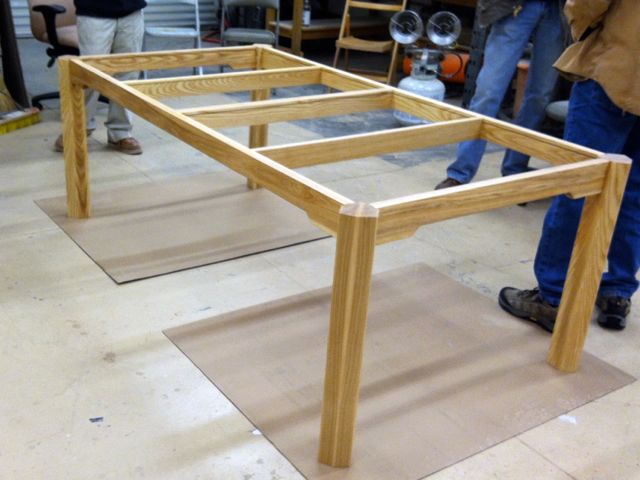
| Ash Apron and Legs |
This one too is made of 8/4 Ash but it's not a knockdown design and about 7' long! When you build a piece like this you better plan first if you can move it to where you want it to be, No spiral staircases for this one! You'll notice that the apron is relieved towards the middle but left as wide as possible where it's mortised and tenoned into the legs. That's where you want the strength but in the middle you want room for peoples legs. The legs on this table are beautiful. They started out being 5 sided which is pretty unusual but then when the facets were cut on the outsides they became a 6 sided design. The inspiration for them came from this book:
The picture has some glare but the title is Creating Coffee Tables and here's an Amazon link
Creating Coffee Tables if you're interested in adding it to your library.
The other book that Jamie referred to for design parameters and concepts is actually available from Amazon as well, however; at $135.00 a copy you may want to explore the internet for free resources, there are many practical design books available that are probably a tenth of that cost. If you want to check it out though, here is the Amazon link to
Seth Stem's book.
Another activity we enjoyed at this meeting was seeing some of our members work and collections. Allison brought in her unique project:
 |
| Allison's Secret Jewelry Stash (shhhh!) |
This was a really well constructed, half lapped, Oak frame which also doubles as a mirror. We're sworn to secrecy but it's a clever concept. This is the rear view of it and you can see how she's used a mesh to hold earrings with a French hook.
Neal has been busy trying his hand at carving and shared this project with the group:
 |
| Basswood Plaque |
Many of you may remember that he's recuperating from a pretty nasty accident and has taken up the challenge of carving to keep his sanity! All agreed that this is a very nice piece.
Ed brought in this plane, another part of his sons yard sale find in the Carolina's:
 |
| Ed's Plane |
This style is known as a Transitional Plane and was manufactured by the Stanley Company. Today we might refer to it as a hybrid. It was to help woodworkers transition from using a wooden bodied plane to a steel one. Kept the wooden sole but added the metal parts to adjust and hold the blade. If you handled it you may have noticed that if you're hands were large it didn't fit! I know people were shorter in the 1800's so it would stand to reason that their hands may be smaller too.
We ended the evening with
Ted's Treasure Trove:
 |
| Beautiful, just Beautiful |
Ted told us that he's been collecting and gathering tools since he was a teenager. Many of the younger members of the group have probably never been exposed to the beauty of old tools. The beautiful brass objects in the middle of the table are plum bobs. They've been replaced by lasers and a double duty chalk box that functions somewhat like a plum bob does. You can see trammel points, a glue pot, old style molding planes, a brace, and Rosewood and brass level. The beauty of these tools is that now they're almost considered to be a work of art with the engraving and designs cast into them. A far cry from the mass produced, Chinese imports that fill the big box stores today. Ted mentioned that he could probably bring stuff for a year and never show the same thing twice.
All in all, a very good meeting and I think everyone would agree. It was nice having people bring stuff in to share with the rest of us. As always, I'm going to encourage you all to plane a demonstration to share with the rest of the group. Many have stepped forward so don't be bashful -- besides if you do it'll save you the $20.00 dues for the year.