Monday, March 21, 2016

If you weren't at this meeting, you missed a GREAT time!

Congratulations to all of us - we just celebrated our 7th year sharing great woodworking techniques and a love of all things wood related. We even started our yearly dues collection, and already have some new members! 

But - better yet, we enjoyed one of the best meetings in recent memory! Leave it to Beth Wheeler to host one of the most enjoyable, hands-on meetings of the year!


This month's SCWW meeting found us all pitching in to make not one, but TWO fabulous Windsor stools, thanks to Beth's preparation and array of tools she brought to share. 

We had a nice turnout - the weather has turned glorious, and there was a buzz in the air. 


Beth's stool, inspired by this Michale Dunbar article in Popular Woodworking Magazine, 


arrived in parts and pieces, and she explained her philosophy of stool making - everything from hand tool work using travishers, scorps and tenon rounders. 


Although Beth started some shaping on the seat during its glue-up phase, various members refined the shape with travisher work. She carefully drew the scoop outline, and we had a blast shaping it! 


She's a whiz with a drawknife!


But first - a bit of history about the stool - Windsor stools feature dramatic splays on the legs, and painted components, which force us to focus on the form of the chair. Because the chairs are usually hand worked, the seats are commonly made of softwoods, so they can be shaped easily. The legs are made from hardwoods for durability. 


Christine and John had some fun with the torch, charring the legs. 


After the legs  were finished, they were wire brushed to remove the soft charred tissue, revealing the harder rays of wood, which gives the legs texture and beauty. A final application of wax finished these off nicely, so they could be fitted into the leg holes. Rick  (with an assist from Aaron) tried his hand at the 7/8" rounder


which is a terrific tool for making perfect tenons. 


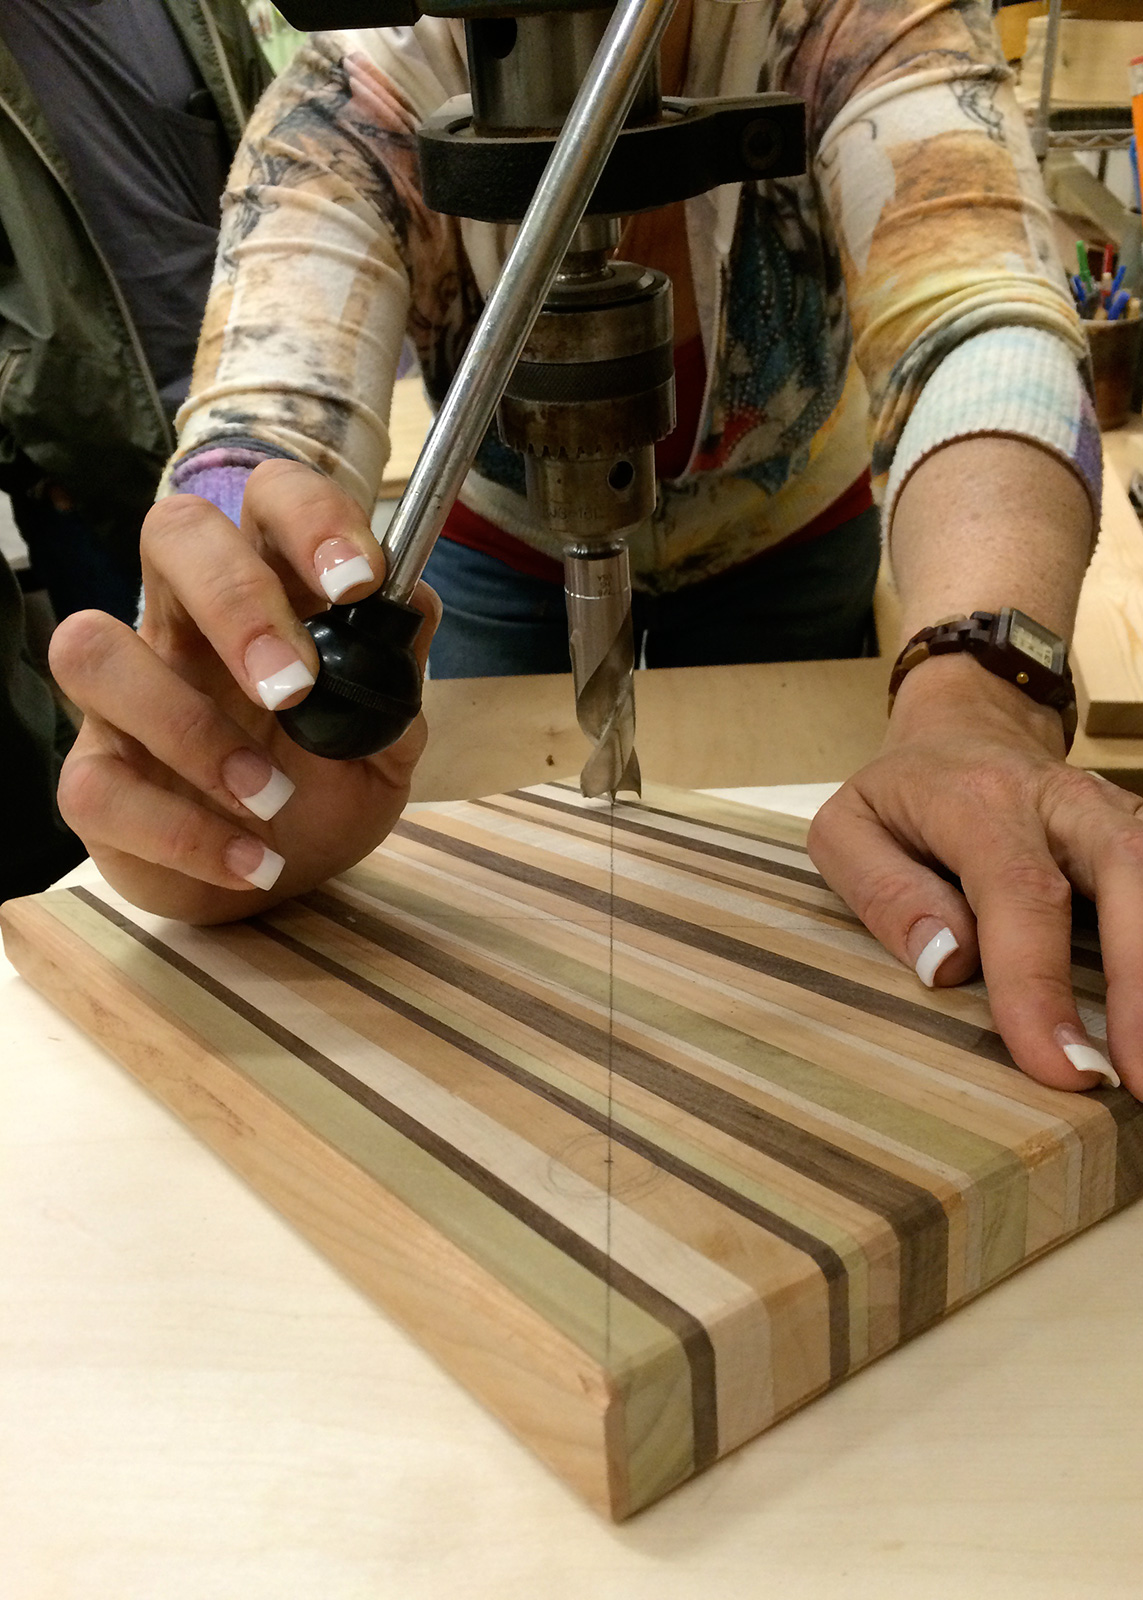
While some were working on the seat scooping and the leg charring, Beth headed to the drill press to drill the angled holes, and showed us a brilliant solution for accuracy. 


This simple angle vise (and her plywood jig) allowed her to set the leg angle, and then drill for the perfect splay of the legs.  


How perfect is that!? 


Using that same angled vise setup, Beth discussed stretcher holes in her larger stools, explaining that she often attaches the three stretchers into their H-shape, and then assembles them into the leg holes. (The smaller stools we were working on didn't have stretchers.) 


One constant frustration is leg leveling, and she showed us a favorite jig for handsawing the legs to their final height. 


Better yet - she gave us a mind blowing tip! Installing a hand plane in a vise, level with the tabletop allows you to carefully level an uneven stool leg with the other legs, by running the leg over the plane, thus carefully taking off small amount of wood. 

Randy's (and my!) mind was blown!


Finally, we were getting close to completion, and Beth shared some down and dirty tips for wedging her tenons. No more sawing, she just puts the leg tenon into the hole, which keeps the leg from splitting, and whacks it with a chisel to create the wedge slot. 


This wedge had to be touched up a bit, so it would fit into the angled hole.


Once the leg was slotted, she applied some hide glue, and installed each leg. 


And BAM!  A whack with the hammer to seat the wedges and we were in business!


Just like that, we had two stools! 


Of course, there was a bit of work left - the legs needed to be trimmed, and we made quick work of that with Beth's Lee Valley flush cut saw.


Almost everyone took a turn with the saw, remarking about its smooth cut with no perimeter scratching. 


What a terrific group project! Thanks to Beth for really upping her game on this presentation, and to all the members who contributed to make this one terrific group effort! 


We have some fabulous meetings planned for later this year, including a Malloof rocking chair and more hand tool demos - stay tuned!


Sunday, February 28, 2016

Our Boulder City Field Trip Re-Cap (It's a new age in video production!)


One of the best things about living in Las Vegas is finding hidden gems that we have living among us. We've experienced that time after time, and this month's meeting again proved that some of the most fascinating woodworkers are right here in our town.


 I take that back, Boulder City is where this month's meeting found us. Braxton Wirthlin' was kind enough to invite our group to learn about his process of making videos for his YouTube channel. Braxton attended the Art Institute of Las Vegas, studying digital media and video production, so in addition to being a great woodworker, he's also a skilled videographer. 

In other words, he's got the whole package going on! 


Braxton explained that is approach to videos has three purposes – he wants them to be informative about woodworking events, he wants to share some how-to techniques and information, and he explains details about the various projects that he builds.

For example, he filmed and uploaded videos about the AWFS show in July, and the Lie-Nielsen tool event in October. He even shared with us his 2x4 challenge project - the championship belt shown here.  


As the evening progressed, we learned that Braxton does most of his filming with his iPhone, or his iPad. He edits everything using iMovie, and says that it's a pretty great film editing program, and you can't beat the cost - it’s loaded into every Apple computer. He has a great set-up in his shop - he can film and edit right by his tools, so it's easy to tell immediately if he need to re-shoot something.


This ingenious set-up - a camera mounted on top of an IKEA kitchen timer, allows him to film panorama shots. He mounted a 1/4" x 20 bolt to the top of this timer, so that he can attach his camera to it. As it spins, it shoots an amazing slow motion sweeping shot. Brilliant.


This flexible tripod allows his iPhone to be positioned anywhere it is needed. He really proves that keeping it simple is the best solution to filming on the fly.


Here he demonstrates a cut, 


and just moments later,


we're all watching it on the overhead monitor. His lighting setup featured a couple of 700 watt Limo Studio lights, which he bought on Amazon. They're inexpensive and do a terrific job! If the lighting needs to be adjusted, it's simply a matter rearranging the light stands to where he needs them.


After his presentation, we peppered him with questions about his films, and he offered some interesting insight about filmmaking, and his audience.

Braxton's main rule is to trust that his audience will understand what's going on in his videos, so that he doesn't have to explain every little thing that he does. I think that's invaluable, as a lot of the videos that I watch contain so much minutia, that I lose interest. So Braxton's assumption that his audience already knows what is going on makes his videos hit the ground running. As he said–you don't need to see every little detail.


He likes to go into his shots late, and leave early, letting the viewers complete those woodworking tasks in their minds. In some cases, he will script out a complex scene and makes story boards for it, to ensure that he captures all of the points that he wants to get across. His methodology is simple and quite effective.

Another important point that he shared with our group is that audio - good audio - is one of the most important aspects of video. He can adjust the audio level of the tools down, so that he can record voiceovers. Right from his iPhone! 

It's amazing to think that in such a short time- the iPhone has revolutionized the way amateur filmmakers can create their videos.

Social media plays a huge part in Braxton's woodworking footprint– he has a YouTube channel, and he posts on Instagram and Twitter. These days, he says his life is about 30% woodworking and 70% computer work.  He often films his videos several different ways– without lights, from behind the saw or overhead, and then edits everything together using IMovie. One very cool thing that he employes is fast motion in his videos,  so that he can show tedious for repetitious techniques in fast motion.  

We also discussed monetizing a YouTube channel, and Braxton brought up some interesting points about music that you can or cannot use. He only uses royalty free music, because YouTube will not allow you to post videos using protected soundtracks. Kevin MacLeod is one composer he mentioned who offers royalty free clips - here's a link.

After his video is filmed, narrated, and music has been added -  it's time to upload and tag it with links so that people can search for him. Custom thumbnails helps people identify what your video is about, and he often create thumbnails using Photoshop. All in all – it's a completely new age a video production. And Braxton has a thorough understanding of what it takes to create great woodworking media.

After the meeting, a few of us hung out and checked out some of Braxton's work– like the bowls that turns on the lathe.


It's always fascinating to visit another person's woodshop and see the ingenious ways that they set it up. I love his space saving method for storing his lathe tools.


And last but best - his giant Jenga game. Braxton recently participated in the third annual Maker'sFaire in Henderson and this Jenga game was a huge hit! 


Congrats to Braxton for creating his own woodworking dynasty down in Boulder City - like I said, he's one of our hidden gems.  If you're ever curious about starting your own YouTube channel, or just want to chat with an all round nice guy and talented woodworking dude - you can contact him through his website... here's a link.


Monday, January 25, 2016

Our January Meeting Re-Cap


These are some big shoes to fill! 

Well, not these exact shoes, 


but I've been tasked with filling John's Blogging Work Boots. Our regular blog writer - John from www.woodworksbyjohn.com is on a six month leave, so I've taken the blog writing duties back onto my plate. I hope I can live up to the standard he's set for this re-cap blog.

We had a well attended January meeting,


 much of it was anticipation for the CNC presentation that Denny LaRocca was giving. He actually brought his Legacy machine to the shop, and set it up, experiencing a few bumps in the process. Who knew that it would have to be dialed in again, after moving it from this shop to Studio:Wood It Is? 


But first, we did our customary introductions and then had are Show and Tell - featuring some very cool pieces. Heather's very nice chess piece, fashioned from a gorgeous chunk of olive wood, was a hit. It was scroll sawn to shape, and then sanded very nicely, 


Mike recounted to the group that Toys for Tots welcomed our toy donations that we shared at last month's holiday meeting.  The toys went to UMC's pediatric ward, which were no doubt - well received. (Thanks to all that participated, BTW!)

He also shared a few goodies, such as this sword he made in Alder for his wife, who studies martial arts, 


and these watchmaker took, which were mini-versions of what we use. 


Finally - Ken brought a fabulous box that he made and carved, made of Brazilian Cherry, with an African Mahogany lid. 


Ken does his carving with dental tools and a ton of patience! What a terrific project! He's still experimenting with the technique, but it's clear to see he's getting better with each example he brings to the meetings. 


Glenn bought in some examples of the CNC work he's been doing, and this Batman carving was verrrry cool. 


He can also say he's got the first buck he ever made!


Finally, Tim brought in an owl that he's been sculpting. The body is made of Basswood, and it started off as an intarsia project, but morphed into this amazing piece.


 Most of the feathers were superglued into place, and the talons on this piece are the only part that are painted. His inspiration often comes from tattoo artwork, and he mentioned deviantart.com as a good place to start looking for images. He possibly has plans to add a mouse (or a rat!) in the talons, hopefully he'll bring that in if he accomplishes that!


When we finally got to the main part of the evening - the CNC demo - Denny was so amped up on Code Red (i.e. - Cherry Mountain Dew) - he was a bit kerfuffled. 


He started off with a few examples of things he's been working on -  from medallions for Tom of Las Vegas Swings, 


some toys, 


and miscellaneous  spindles. 


His demo involved designing (using Aspire software) 


and making this awesome nut and bolt. There's an unbelievable amount of external factors that have to be worked out, like  machine calibration, bit speed, bit profile, and so much more...


Here's the bolt being cut, 


and the finished product, which took seven minutes and 49 seconds to machine. 


 Imagine how making a threaded rod like this could be adapted for simple clamps and vises. Denny's been experimenting with a ton of threading, but personally -  I like this skull rolling pin the best! When he perfects this design, I am totally using this making pie crusts!


 Here's a video of the bolt being cut  (thanks for the video, Lupe!) - as always, this  meeting was informative! Thanks to Denny for taking the time to transport his CNC, and to all who attended. 


Next month? Possibly a field trip, and our SEVEN YEAR anniversary!